EXPL supports several different modes of bitmap transparency. Transparency means that parts of a bitmap can be set so that the underlying image shows through. This is useful in all kinds of applications ranging from games to scientific programs.
Alpha. Transparency is usually specified using something called an "Alpha" value that specifies the degree of transparency. In EXPL, transparency is specified as a value between 0 and 255. A value of zero means total transparency, so that no part of the top image is visible and all of the underlying image is visible. A value of 255 means there is no transparency, so that all of the top image is visible and no part of the underlying image is visible. A value of 128 would mean that about half of the underlying image shows through.
Modes. EXPL has three different modes of transparency: 1) Single Color Mode, 2) Whole Image Mode, and 3) Individual Pixel Transparency. All modes of transparency work with the CopyImage intrinsic. When one of the transparency modes is enabled, the CopyImage intrinsic copies the image with certain parts of the image transparent. Since the CopyImage intrinsic can copy images to the screen, it can display images transparently. All transparency modes are set using the SetCopyMode intrinsic.
Combining Modes. The copy operation can be repeatedly performed on the same bitmap. This means that the various transparency modes can be combined to create complex regions of partial or complete transparency.
1. Single Color Mode. In this mode you set a single color to be transparent. Every pixel that matches the specified color is made completely transparent. The mode is set with the SetCopyMode intrinsic. The following example would set every green pixel to be transparent.
SetCopyMode(1, 0, 0,255,0);
Once the mode is selected, copying the image with the CopyImage intrinsic makes the green parts of copied image transparent. In the following example, the Source bitmap is copied to the screen with all green pixels set transparent.
CopyImage(Source, 0,0,Width,Height, -1, 0,0,Width,Height);
2. Whole-Image, Adjustable Transparency. With this mode transparency is controlled for the whole image at once, and it can be varied from completely opaque to completely transparent. The mode is set by selecting Copy Mode-2 with the SetCopyMode Intrinsic and using Alpha values between 0 and 255. A value of 0 means the image will be copied completely transparently. A value of 255 means the image will be copied completely opaquely.
Here is an example that fades an image onto the screen using increasing Alpha values:
|
The key part of the code is on lines 7 and 8. On line 7, the Alpha value is set by the for-loop variable that increases from 0 to 255. On line 8 the image is copied to the screen with the specified transparency. Each time through the loop, the screen is cleared, the Alpha value is increased, and the image is copied to the screen. It gradually fades into view.
2. Individual Pixel Transparency. EXPL uses 32-bit color images so every pixel in a bitmap or on the screen has an Alpha value in addition to its RGB values.
Pixel Values:
Byte-0 |
Byte-1 |
Byte-2 |
Byte-3 |
Blue |
Green |
Red |
Alpha |
|
|
|
|
Setting the Alpha value for individual pixels enables you to control the transparency of every pixel in an image. The main tool for setting the Alpha mode of individual pixels is Copy Mode-12. It works by setting any pixel that matches the specified color to a certain Alpha value. For example, using the following settings would cause all Red pixels to be set to 50% transparency:
SetCopyMode(12, 128, 255,0,0);
The Alpha values aren't actually set until you copy the image. In the following example, the image is copied back to itself:
CopyImage(Handle, 0,0,Width,Height, Handle, 0,0,Width,Height);
The process can be repeated as many times as you want, each time setting different colored pixels to different levels of transparency.
Per-Pixel Mode. A Mode-12 copy is only used to set pixels to be transparent; it is not meant to display them. To actually display or copy an image with individual pixel transparency, you must copy using using Mode-2 in Per-Pixel Mode. Per-Pixel Mode is activated by setting the high byte of the Alpha value in Mode-2 to a non-zero value. When Per-Pixel Mode is activated, the bitmap is will be copied using the separate, individual Alpha values for each pixel. Since every pixel can have different Alpha, every pixel can have a different level of transparency.
Combined Effects. Since Mode-2 also has its own, whole-image Alpha value, there are two different Alphas operating on the image. The overall Alpha and the individual Alphas for each pixel are combined to work together. For example, if the alpha for an individual pixel is 128 and the overall Alpha is 128, the resulting combined Alpha for the pixel would be 64. Here is some code that illustrates using the two different Alphas in combination:
|
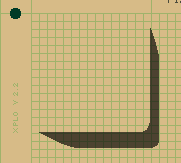
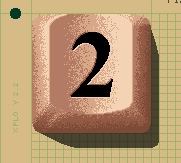
The code demonstrates how to create a partially transparent shadow around an image. The images below illustrate the process:
1 - Basic Shadow Image |
2 - Shadow Drawn With Transparency |
3 - Completed Shadowed Image |
|
|
|
1. Picture 1 shows the shadow image before it has been made transparent. On line 1 of the code the image is loaded into ShadowBM. On line 3 the Copy Mode is set so that the white parts of the image are completely transparent. On line 4 the Image is copied to itself to implement the transparency.
2. Picture 2 shows how the fully transparent and partially transparent parts of the image are displayed on a background. On line 5 the overall transparency is set to 128, which gives 50% transparency to the whole image. Since the white parts of the image have been set to be fully transparent, those parts disappear completely. The rest of the image is set to 50% transparent, so the underlying image partially shows through, giving it a realistic shadow effect.
3. Picture 3 shows the completed image. By controlling the order in which the images are drawn, you can control which items the shadows fall upon. |
||