|
COMPASS For
Windows |
|
|
|
Getting COMPASS
|
|
|
|
Download/Install Issues
|
|
|
|
Registration
Information |
|
|
|
Auxiliary Tools/Information |
|
|
|
Tutorials - (New) |
|
|
| Links |
|
|
|
Documents/White Papers |
|
|
|
COMPASS For DOS |
|
|
|
MISC. |
|
|
|
|
|
|
|
|
|
|
Merging |
| V. Merging. At this point, you should have
copies of all your sketch-maps that have been scaled, trimmed and
morphed. In the next step,
we are going to combine them all into a single image. |
|
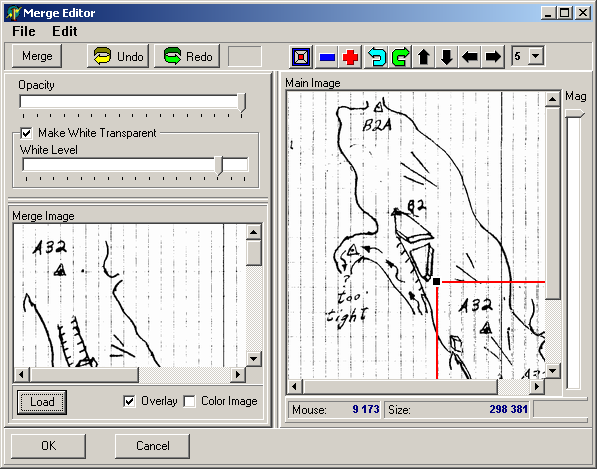
A. Load First Image.
At the main
window, press the Load button and load the first sketch-map image.
|

|
| If it is a long narrow passage, the first image in your
merge will probably be
the sketch-map for the first shots in the survey. If the passages are
more complex, you may want to the think about the best sequence to
combine the sketches. Now press the Merge Button. The will bring up the Merge
Tool. |
|
B. Load Merge Image. We will now load the image
that will be overlaid on top of the main image. Press the load button in the lower left corner and select
the second sketch in the survey |
| At this point, the first image will appear in the right hand window
and the second image will appear in the lower-left window. The second image
will also appear overlaid in the right hand window. |
|
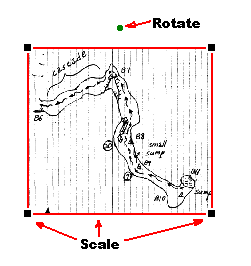
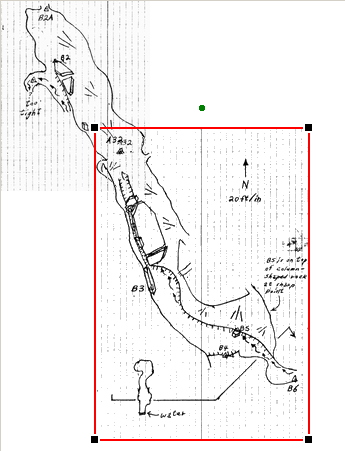
C. Moving, Sizing and Rotation.
The overlaid image will appear enclosed in
a red frame. The frame can be used to move, resize and rotate the
overlay image. Dragging the
green dot at the top rotates the image. Dragging the square boxes at the
corners, resizes the image. Dragging the interior of the box moves the
image. Since we have already scaled and rotate all our images, we only
need to position the image.
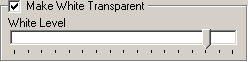
D. Image Transparency. The image is also partially transparent.
The black parts of the image remain opaque while the white parts are
transparent. Since the background of most sketch-maps is white, this
allows the underlying image to be seen through top image. This makes it
easy position the image for merging. It also allows the lines from both
images to blend together when the images are merged. |
|
| If the background of your images is not
pure white, the background may not be as transparent as you would like.
You can make an off-white background more transparent by adjusting the
"White Level" sensitivity. |
|
|
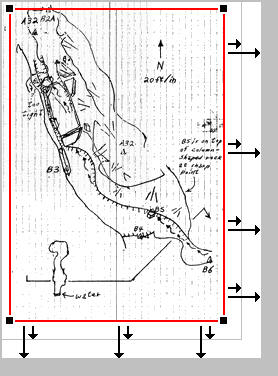
5. Auto Expansion. As you drag the
overlay image around the screen, the underlying image will automatically
expand when the edge of the overlay reaches the edge of main image. In
this way the image is automatically expanded so the overlay always fits.
This works for the top, bottom, left and right sides of the image.
Note: If you are working with large images, you should be a little
careful about how much you let the images expand. Since the number of
bytes in the image goes up with by square of its dimensions, you can run
out of memory if you aren't careful.
If you have made the image larger than necessary, you can undo the
size change using the Undo Button. You can also trim the image with
Editor when you have finished merging. |
|
|
F. Final Positioning. The final step
is to position the overlay sketch-map so the two images fit together
perfectly. Since we have already scaled and de-rotated our images, all
we have to do is move the overlay to the correct position. Simply move
the overlay until the common passage walls and survey stations match.
Since the overlay image is transparent, this will be easy to see. In
fact, if the sketches were accurately drawn you should have little
trouble getting everything to line up.
When you are happy with the alignment, press the "Merge" button on
the tool bar. The two images will be combined into a single image.
G. Merging More Images. You can now add additional
sketch-maps
to the combined image. Just follow steps B through F for each of the
rest of the sketch-maps. You may want to exit periodically (by clicking
OK) to save your work. |
 |
|
|
|
|
|
| Sponsored Links |
|
|
| Sponsored Links |
|
|
| Sponsored
Links |
|
|
| Sponsored Links |
|
|
|