There are several options that control how the VRML data is exported. The options can be found by clicking on the "VRML Export" tab.
Here is a detailed description of each option:
A. 3D Passage Options. 3D passages are constructed from the Left, Right, Up and Down measurements entered by the surveyor. These options control the appearance of 3D passage models.
1. Show 3D Passages. When this option is enabled, the cave passages are exported as a 3D passage volume that the approximates the actual passage size and shape. |
|
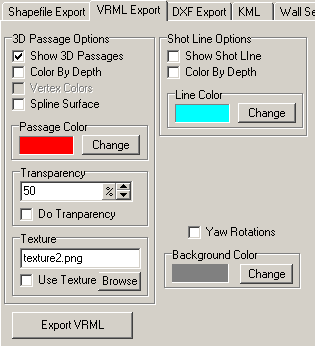
2. Color By Depth. When this option is enabled, the passages are colored according to their depth. The colors are arranged chromatically, with highest passages being red and lowest passage being deep purple.
3. Vertex Colors. This options controls how the depth colors are applied. If this option is off, each face gets a separate depth-color. If this option is on, each point gets a separate depth-color. This makes the depth coloring much smoother, but also increases the size of the VRML file, and on some computers, it may slow the display.
4. Spline Surface. The passage walls are automatically smoothed by Compass when they are exported to a VRML file. However, this option increases the smoothing operation. On some computers, using Spline Surfaces may slow the display.
5. Passage Color. This option controls the passage color if you the Color-By-Depth option is not enabled.
6. Transparency. When the option is enabled, the passage wall appear to be transparent. This allows you to see the shot lines inside the passage if you have them enabled. (See below).
The level of transparency is controlled by setting the Transparency Percentage. Zero percent transparent is completely opaque, where as 100% transparent renders the passage invisible.
7. Texture. This option allows you to texture the cave passages with any bitmap image. For example, you can texture the passage with a limestone texture to give the passages a more realistic appearance. There are two textures included with Compass (Texture1 and Texture2) that are actual photographs of limestone.
To use a texture, you simply enable the option and choose a file using the browse button. Because of VRML limitations, the textures must be JPG, GIF or PNG files. When you display your VRML file, you must include the texture in the same directory as the VRML file.
B. Shot Line Options. The shot-line options allow you to export the cave a series of lines that correspond to the survey shots. This creates a much smaller VRML file and is useful when you are trying to display a very large cave. The option can also be used with 3D Passage Option described above. If you make the 3D Passages transparent, you will be able to see the shot –lines through the passage walls.
1. Show Shot Line. When this option is enabled, the shot-line is exported.
2. Color By Depth. When this option is enabled, the shot-lines are colored according to their depth.
3. Line Color. If the Color By Depth option is not enabled, this option controls the shot-line color.
C. Yaw Rotations. Option installs animation code in the VRML file. With this option enabled, clicking on the cave passage will cause the cave to slowly rotate 360 around its vertical axis.
D. Background Color. This option controls the background color of the screen. Different background colors make certain passage details and coloring more visible. Dark colors usually work best for solid passages, whereas, lighter colors work better for transparent passages.