The Image Editor allows you to resize any image loaded into Compass. It uses special routines to that minimize artifacts that can occur when an image is expanded or contracted. To resize an image, select the “Resize Page” on the left side of the screen.
The following options are available:
Resize Button. The Resize Button appears at the top of the Resize Page. Pressing the button causes the program resize the image. The result will be displayed to the right. The size and appearance of the image is control by the options described below.
New Size. This option displays the width and height of the image after it is resized. You can increase the size by pressing the Up Arrow. You can decrease the size by pressing the Down Arrow. You can also adjust the Height and Width separately.
Keep Aspect Ratio. If the option is enabled, the program will maintain the same ratio of height to width, even if you adjust the Height and Width controls separately. If the option is off, the Height and Width can be adjusted separately, which allows you to do non-proportional scaling. |
|
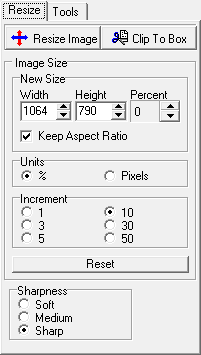
Units. This option control the units that are used to change the size of the image. The Percent Option changes the size by a percentage. For example, if you increase a 100x100 image by 50%, the new size will be 150x150. This option is generally used when you want to make large changes. The Pixel Option changes the size by a certain number of pixels. It is generally used when you want to make small, precise changes. It is also use to make the new image a precise size.
Increment. This option controls how much change occurs each time you press the Up or Down arrow. The units will be either percentage or pixels, depending on which units are used.
Reset. Pressing this button resets the new image size to the original size of the image.
Sharpness. This option controls the appearance of the image. If you set the option to “Soft”, the resulting image will be soft and smooth, but may be missing some fine detail. If you set the option to “Sharp” there will be more fine detail, but there maybe some artifacts around the edges of objects.
The artifacts are caused by the way the image is expanded or contracted. When an image is expanded, the program creates an image that has more pixels than the original. For this reason, the program has to guess at how these missing pixels will look. Likewise, when an image is contracted, the program has to throw away extra pixels. These two problems produce artifacts in the image such as jagged borders around the edges of objects or missing lines. To solve this problem, the Image Editor uses special filters to smooth image. The sharpness option controls how aggressive the program is in dealing with the missing information.