It is sometimes useful to run other programs directly from the Viewer. As a result, the Viewer has the ability to attach any DOS or Window program to its menu. This makes it easy to run the program without searching through folders or the task bar.
Executing External Programs. Once a program is attached, a new menu item will appear on the menu bar just below the "Tools->Add User Tools" item. Clicking-on the menu item will execute the program. (If the program is already running, it is brought to the foreground.)
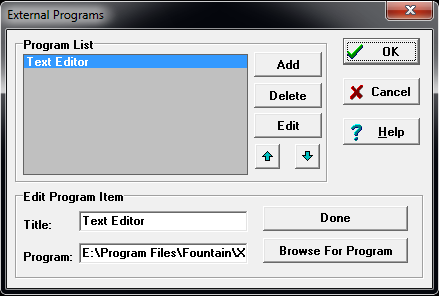
Attaching Programs. You can add new tools to the Viewer’s menu by selecting the "Tools->Add User Tools" from the menu bar. When you do this, the "External Programs" window will appear.

Program List. On the left side of the window is a list of programs. These are the programs that will appear in the menu. You can add, edit, move or delete program items. Here are detailed descriptions of the options:
1. Adding Items. You can add new program items by click-on the "Add" button. When you do this, the bottom half of the window will expand to reveal the "Editing" area. To add a new item, you simply enter the "Title" and the filename of the program. The "Title" is the name that will appear in the menu. The filename is the drive, directory and name of the executable file that will be run. To make it easy to find programs, you can browse through your disk using the "Browse" button.
Short Cuts. You can create a "Short Cut Key" for the item by placing an ampersand "&" character in front of one of the letters in the title. The letter following the ampersand will be underlined when it appears in the menu and you can select the item by typing that key. For example, the item "&Database” will be displayed as "Database", with the “D” acting as a shortcut.
Finishing Up. When you have entered a title and selected a program, click-on the "Done" button, and the new item will appear in the "Program List."
2. Editing Items. You can edit existing program items by clicking-on the desired item and then clicking-on the "Edit" button. When you do this, the "Editing" area will appear and you will be able to edit the Title and filename. (See "Adding Items" above.)
3. Deleting Items. You can delete any item by selecting it and clicking-on the "Delete" button.
4. Moving Items. You may want to put the most commonly used tools at the top of the menu for easy access. The items will appear on the menu in the same order they appear in the list. For this reason, you can move the selected item in the list by clicking-on the up or down button.