The Animation Page allows you to capture particular viewpoints of the cave for the starting and ending points of an animation sequence. It also allows you to play back animations sequences and edit the animation to make it better. Here is a detailed description of animation creation process:
I. Adding Animation Points. Animations are created by saving a series of viewpoints of the cave into memory. These viewpoints consist of the pan, zoom and rotate parameters for a particular image of the cave. Once the points are saved to memory, the computer can generate intermediate points that smoothly transition between any two positions. By rapidly playing back these intermediate points, you get a motion picture of your travels around and through the cave.
Capturing Images. The process of creating an animation is easy. You begin by finding a starting view for the animation. Just zoom, pan or rotate the cave until you have a good starting position. You then click-on the "Add Point" button. This will save the first point to memory. Now, you move to another position and, once again, click the Add Button. |
|
It is not necessary for the viewpoints to be close together because the program will create many intermediate steps to animate smoothly between any of the two positions. You can use any combination of zoom, pan or rotatebetween points because the program will generate intermediate zoom, pan and rotate position that smoothly transition between the points.
II. Editing Animations. Once you have saved several view points, you can edit the animation to correct any problems.
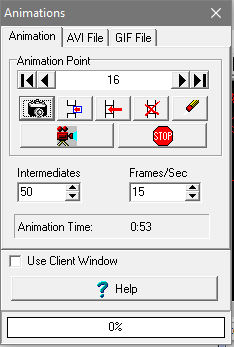
The Animation Point Control. The Animation Point Control allows you to select individual points for editing. The number in the center shows the current point number. If no number is displayed, no points have been captured. Pressing the left and right arrows move you backward and forward through the points. The Left and Right arrows with Bars allow you to move to the beginning or end of the animation.
In this way, you can step through the whole animation one point at a time and the select a point for editing. As you step through the points, the display will change, showing the image that is associated with the current point.
Editing Operations. Once you have selected a point you wish to edit, you can perform four different operations on the point:
1. Overwrite. The Overwrite Button causes the current viewpoint to overwrite the selected point. This allows you to replace any existing point with a new point.
2. Insert. The Insert Button causes the program to insert the current viewpoint just before the currently selected point. This allows you to insert additional points anywhere in the animation without overwriting any existing point.
3. Delete. The Delete Button deletes the currently selected points. This allows you to remove one or more points from your animation.
4. Erase Animation. This Erase Animation button, deletes all viewpoints.
III. Playing Animations. Once you have accumulated a number of points, you will want to play the animation to see if you are capturing the sequences you want.
Playing. You can start playing back the movie by hitting the "Play Animation" button. Each viewpoint and all intermediate points will be displayed on screen in sequence. There are several parameters that control the speed and smoothness of the play back:
Intermediates. This options controls the number of intermediate points the computer generates between each pair of viewpoints. The more points, the smoother the animation, but the slower the play back. The “Intermediates” value and the “Frames/Second” value control how long the animation will last.
Frames/Second. This options sets the number of frames per second that the Viewer will use to play back the animation. This is number is only a maximum limit for the playback. If the computer is slow, the cave is large or one of the more complex viewing options is used, the program may not be able to keep up with the frame rate.
Stop Button. The Stop Button allows you to abort an animation before it has finished playing.
Animation Time. This box displays the number of minutes and second the animation will run. The animation time is determined by the “Intermediates” and “Frames/Second” options described above. (Since the computer may not be able to keep up with the number of frames per second specified, the actual time may be slower than estimated.)
III. Notes On Animations. There are a few tricks that will help you create the kind of animation you want.
1. Passage Modeling. If you are working with a large cave and you want to use one of the passage modeling modes, each frame of the animation can take a long time to draw. For this reason, you want to turn off passage modeling while you are setting up the animation. That way you can set up the pans, zooms and rotations without have to wait while frames are being drawn. Like wise, you can view what the animation will look like at full speed if you turn passage modeling off.
Once you are satisfied with the animation, you can turn passage modeling back on and save the animation file. Even though saving the file will go slowly, when the file is saved and played back, it will display at full speed.
2, Looping Animations. If you display a GIF animation on a web page, the animation will repeatedly loop by default. When the animation reaches the end of the sequence, it will immediately start over. It often nice to pause at the end of the loop so the user has a chance to study the cave at the end of the sequence. An easy way to add a pause at the end of the animation is to insert another animation point without changing the pan, zoom or rotate positions. This will give the impression that the animation has paused for a short period of time. The more of these points you add, the longer the pause.