When a cave is first plotted on the screen, you see an overview of the whole cave. It is often useful to zoom in on certain parts of the cave to examine them in detail.
Selection Box. The Viewer uses a "Selection Box" to zoom in on portions of the cave. The Selection Box shows you what part of the cave will be displayed when you zoom. When a cave is first plotted, the Selection Box is drawn around the outer edge of the window. You can shrink the box and move it around. It will also rotate to show you the angle of rotation.
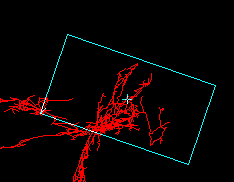
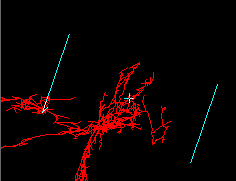
If you are in profile mode, the top and bottom of the Selection Box will disappear, illustrating the fact that, in profile mode, you "look" through the box from the angle of rotation.
Magnifying. Shrinking the Selection Box is the equivalent of magnifying the image of the cave. As the box gets smaller, less of the cave will be selected for viewing and so it will be bigger. Likewise, as the box gets larger, the more of the cave is selected and so the magnification is reduced.
There are several ways to change the size of Selection Box. You can use the Plus and Minus buttons on the Tool Bar to increase or decrease the magnification. (Note: These buttons can auto repeat to speed the changes.) You can also do the same thing using the PageUp or PageDown keys and the "Action->Zoom->Zoom In" and "Action>Zoom->Zoom Out" options from the menu bar.
![]()
Panning. You can also move the box from side to side or up and down. This operation is called "panning" and it changes what part of the cave will be selected for viewing. You can pan the selection box by click-on the “arrow” buttons on the Tool Bar. (Note. These buttons can auto repeat to speed the changes.) You can also use the “Arrow Keys” on the keyboard or the “Action->Pan” options from the menu bar.
![]()
Using The Mouse. You can also use the mouse to set the position and size of the selection box. You do this by moving the mouse cursor to a location on the screen, holding down the left mouse button and dragging the cursor across the screen. As the cursor moves across the screen, a Selection Box will form that tracks the mouse. In this way, you can place a precisely sized Selection Box anywhere you want on the screen. To help you do this, you also have control of how the box is drawn. You can choose to have the box expand from the center or from the corner.
Entering The Box. Again, the Selection Box shows you which part of the cave is selected for viewing. Once you have selected a portion of the cave for more detailed viewing, you can change to Zoomed Mode and “enter” the box to see a more detailed view of the cave. In other words, the area selected in the box is expanded to fill the whole screen, thus magnifying the image. Since this is such a common operation, there are four ways to do this:
1. Click-on the "Enter Box/Redraw" button on the tool bar.
2. Use the Right-Click Context Menu.
3. Hit the "D" key, or the <Enter> key on the keyboard.
4. Select the "Action->Enter Box or Redraw" option from the menu,
![]()
Double Clicking. You can also double click any where on the screen. This will put you in zoomed mode and will center and zoom on the point you just clicked on.
Instant Action. After you have “Entered” into the box, things work a little differently. Every action is carried out immediately. For example, if you drag the mouse across the screen, a box will be drawn, but when you release the mouse button, the cave is immediately redrawn to match the box you have created. Likewise, any pan, magnify, rotation or change of modes will occur immediately. When you change back to Overview Mode, the Selection Box will stay on the screen and actions won’t be carried out immediately.