The Settings Window allows you to the set general operating characteristics of the Viewer. To access the Settings Window, select the “Preferences->Settings” option from the menu bar. The Settings Dialog is divided into three pages: General Settings, Coordinate Settings and Interface Settings. Here are a detailed descriptions of the each section:
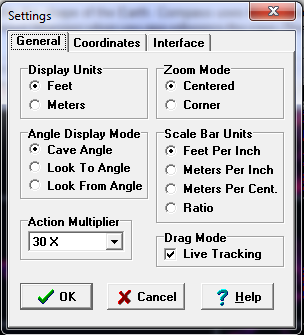
I. General Settings. The first page of the Settings window controls general programs settings. Here is a detailed description of each item:
|
|
II. Coordinate Settings. This pages controls the Geographic Coordinates used by the Viewer:
A. Datum. This item displays a list of commonly used Geographic Datum. A Datum is a mathematical model used to describe the shape of the Earth. Compass uses these models to convert data between UTM and Longitude/Latitude when displaying Station coordinates. The Datum in normally set in the Project Manager when you geo-reference the cave. This option is available so you can override the value set in the Project Manager. Normally, you would not change this value. |
|
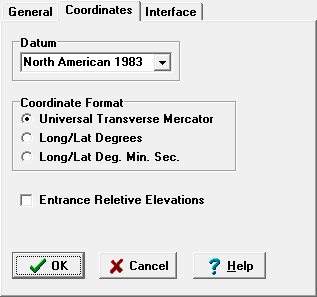
B. Coordinate Format. This item controls what units are used to display the station coordinates. Here is a detailed description of each option:
1. Universal Transverse Mercator. Universal transverse Mercator (UTM) is a mapping system used for local, small scale mapping. It has the advantage that the coordinate grid is square and the measurements can be made in normal linear units, not angles on a sphere. Compass uses this format as its internal coordinate format, because it matches the cave plotting is done. The two coordinates in UTM measure the distance East of a central meridian and North of the Equator. Compass displays the values in this order. UTM coordinates are normally displayed in Meters, but you can also choose to display them as Feet.
2. Long/Lat Degrees. This option displays the coordinates as Longitude and Latitude as decimal degrees.
3. Long/Lat Deg. Min. Sec. This option displays the coordinates as Longitude and Latitude as degrees, minutes and seconds.
C. Entrance Relative Elevations. If you've set a fixed geographic location for stations in the cave, the elevations in the cave will be relative to sea level. When you display station elevations, those elevations relative to sea level, which can be thousands of meters or feet. Enabling this option displays the elevations relative to the caves entrance. This is useful for determining the depth of the cave below the entrance.
Note: if the cave is not geo-referenced, displaying Longitude/Latitude will produce meaningless numbers.
III. Interface Settings. This page deals with the way the program interacts with user. Here is description of the options:
1. Start Up Size. This option control the size of the Viewer window when the program starts. If the option is set to "Normal" the Viewer starts up smaller than the whole screen. If the option is set to "Maximized" the Viewer starts in full screen mode. Remember, the "OK" button must be pressed when exiting the Settings Window or else the changes will not take effect. |
|
|
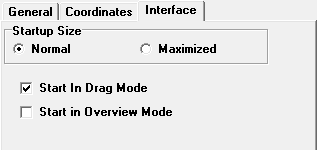
2. Start In Drag Mode. This option controls whether the program will start in "Drag Mode." Enabling this option and then selecting the "Preference->Save User Default" from the menu bar will cause the program to start in "Drag Mode" the next time it is run. Disabling the option and saving defaults, will force the program to start with Drag Mode off.
3. Start in Overview Mode. The Viewer has two main modes of operation: Overview Mode and Zoomed Mode. The program normally starts in Overview Mode and then shifts to Zoomed Mode when you press the "Zoom Button". Disabling this option caused the program to start in Zoomed Mode.