There are some useful tricks that can be used to manually adjust the cave map to match an existing map.
1. First, load the map into the drawing program you have been using to edit the map; for example Inkscape. |
|
2. Set the program you are using so it displays coordinates in Inches or Millimeters. In Inkscape you do this by selecting the "File -> Document Properties" option from the menu bar. Now change the "Default Units" to Inches or Millimeters. |
|
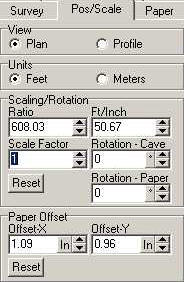
3. Load the corresponding file into the SVG Exporter. On the "Pos/Scale" page of the Exporter, set the Units to Feet or Meters, depending on whether you are using Inches or millimeters in the drawing program. |
|
4. In your drawing program, measure the location of two points at either extremes of the cave. In most drawing programs, these coordinates will be displayed somewhere on program and they will change as you move the mouse across the image. In Inkscape, they appear in the lower right corner of the program. |
|
5. In the SVG Exporter, measure the positions of the same locations. Use the "Paper" coordinates displayed below the cave image. |
|
6. You now want to adjust the the image using the tools on the Pos/Scale page. Adjust the Scale, Rotation and Paper Offset until the coordinates match coordinates in the drawing program. This an iterative process of adjusting and readjusting. Alternate between the two position and gradually the difference will be reduced. Some drawing programs may use a different coordinate system than the SVG Exporter. For example, one program might measure the y-coordinates from the top of the page and another from the bottom. You can usually get around these issue by subtracting or adding the paper size to the coordinates. |
|
These step should allow you match the coordinates on an existing map to a relatively high degree of accuracy. |