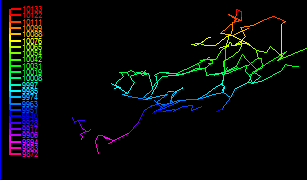
A depth bar is a kind of ruler that appears along the side of the plot. It is used to give you a visual representation of the depth of the cave. You can enable depth bars by selecting the "Display->Show->Show Depth Bar" from the menu bar. (Bear in mind that depth bars may not appear immediately, since they only work when the Viewer is in certain modes.)
Depth-Bar Options. The Viewer provides several different kinds of depth bars that can be used in your plots. You can control the different types of depth bars by selecting the "Preferences->Set Depth Bar" from the menu bar. Here are detailed descriptions of the different depth-bar options:
I. Mono Colored Depth Bars. Mono depth bars are drawn with a single color. Mono colored depth bars only display when you are in Profile mode because the depth “ruler” has no meaning unless it is displayed next to a profile of the cave. For this reason, mono-colored depth-bars are always scaled to exactly match the cave. The color and font for the depth are selected using the Color/Font Window. There are several options that control the way the mono bars work.
A. Tick Spacing. This option controls the way the "tick marks" are placed on the depth bar. There are two basic types of spacing, "Count Spacing" and "Modulo Spacing." |
|
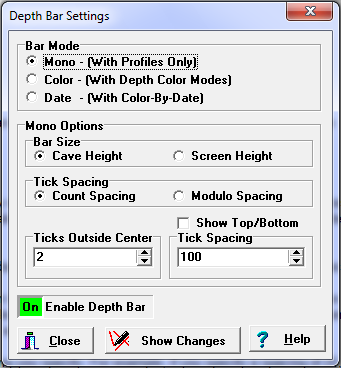
1. Count Spacing. In "Count Spacing" mode, the depth bar always has at least three tick marks on it -- one on the top and bottom and one in the center. The "Count Spacing" option allows you to set the number of ticks above and below the center mark. For example, if the value is set to two, there will be two ticks above and two ticks below the centerline, for a total of seven ticks. The values are entered in the "Ticks Outside Center" edit box.
2. Modulo Spacing. In "Modulo Spacing", the tick marks are placed at even multiples of the spacing you specify. For example, if you specify a spacing of 25, the marks will appear at values like 25, 50, 75 etc. The values are entered in the "Tick Spacing" edit box.
B. Cave Height - Screen Height. This option controls the size of the mono-colored depth bar. If the option is set to "Cave Height," the bar height is set so that the top and bottom align with the top and bottom of the cave. If the option is set to "Screen Height", the bar fills the screen vertically.
C. Show Top/Bottom. This option only applies to the "Modulo Spacing" mode. It tells the program to mark the top and the bottom of the cave on the depth bar. There are times when marking the top and bottom of the cave is not useful. This is because the top and bottom marks come too close to the modulo-ticks and they obscure each other.
II. Colored Depth Bars. This option displays a colored depth-bar where the colors match the sequence and spacing of the color-by-depth colors. The option only works when the Color-By-Depth or Complex Color-By-Depth options are enabled. If you are in Profile mode, the colors and the scaling exactly match the cave. If you are using the Complex Color-By-Depth option, the non-linear color schemes are displayed and exactly match the cave colors. If you are in Plan mode the scaling the bar makes no sense so the bar simply fills the screen.
III. Dates. The Color Bar also works with survey dates. If you are using the simple color-by-year option, selecting this modes causes the program to display a legend showing the color that goes with each date. If you are using the Complex Color-By-Date mode, the program displays a color bar that corresponds with dates.