Once you have loaded an image into Compass, once you have selected an image, the program will display the image and plot the cave on top. You can now tie the image to the cave so that no matter how you pan, zoom and rotate, the image will be track the cave.
Adjusting The Bitmap. You can adjust the size and position of image relative to the cave by selecting "File->Bitmap->Adjust Bitmap" from the menu bar. This will display the "Adjust Bitmap" window.
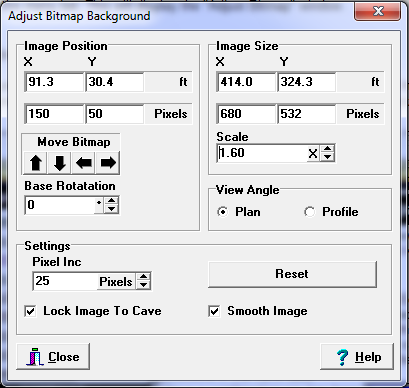
This window has four options that allow you to adjust the bitmap:
1. Pixel Increment. Each of the options allows you to move or resize the image a certain number of pixels. The Pixel Increment option allows you to set the size, in pixels, of each change. By clicking on the up and down arrow buttons, you can increase or decrease the increment size.
2. Image Position. This option allows you to move or set the position of the image relative to the cave. By default, the image is positioned so the center of the image falls on the first station is the survey, which is normally the entrance. If the image were a topographic map, you would move the image so the entrance of the cave falls on the correct position on the terrain.
The arrow buttons move the bitmap up, down, right or left. The bitmap will be moved by the number of pixels specified in the Pixel Increment box. This allows you to move the bitmap to any position on the screen. (Parts of the bitmap can be positioned off the screen.) The position is displayed in pixel and meters/feet from the center of the image.
3. ImageSize. This option allows you to change the size of the image, effectively scaling the image so it matches the scale of the cave. Pressing the up and down arrows increase or decreases the scale of the image. The scale is displayed as a multiplier which can increase or decrease the size. For example, 1.5 will scale the image 50% bigger and 0.5 will make the image 50% smaller. The width and height of the image in pixels, and feet/meter is also displayed.
4. View Angle. This option controls whether image will be displayed only when Compass is in Plan View or only when it is in Profile View. This is because images are two dimensional and only make sense viewed from the appropriate angle. For example, it does not make much sense to view a topographic map in profile.
5. Lock Image to Cave. This option controls whether the image is locked to the cave. If the image is locked to the cave, the image will pan, zoom and rotate in synchronicity with the cave.
6. Smooth Image. When this option is enabled, the image is smoothed as it is panned, zoomed and rotated. The makes the image clearer, especially for topographic maps, which have lots of parallel lines. The only disadvantage to this option is that it is slightly slower.