Adopting Files. If you have an SVG map that was not generated by Compass or Walls and doesn't have the required layers to work with a cave survey program, you can use the SVG Exporter to make it useable in either program. I call the process "Adopting" a map. The process is a little tedious, but once it is completed, the work of maintaining the map will be simplified. You'll be able to perform the same Merger, Adjust and Morph operations as any map that was originally created with Compass.Here is a complete description of the steps needed to adopt a map. A. Load The Plot File. To Adopt a map, you need a Compass Plot File for the cave in your drawing. The file doesn't have to exactly match the cave drawing. It can be newer and have additional passages. When you have located the file, load it into the SVG Exporter using by selecting the "File -> Open" option from the menu bar. |
|
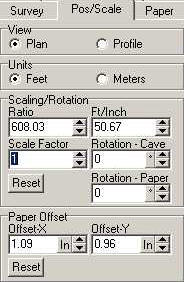
B. Match the Scale, Position and Rotation. You should now adjust the scale, position and rotation of the cave to match the SVG map. You can do this using the Pos/Scale page on the left hand panel.If you know the scale of the map, enter it here. If you don't know the scale, manually adjust the cave until it appears to be the right scale. Click here for Manual Adjustment Tricks. Likewise, adjust the Paper Offset to match the image in your drawing program. Again, this will be a manual adjustment. Click here for Manual Adjustment Tricks. |
|
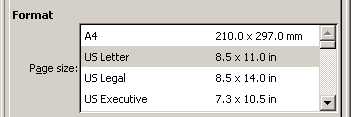
C. Set The Paper Size. Using the "Paper" page, set the paper size. You should be able to tell the paper size by checking the settings in your drawing program. In Inkscape you can view the paper size by selecting the "File -> Document Properties" option from the menu bar. |
|
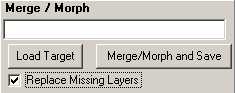
D. Perform A Merge. You now want perform the normal Merge/Morph process. Since all your drawing element are not in the right layers, the Merge/Morph process won't actually adjust your drawing. This is exactly what we want because the file isn't ready for actual adjustment. However, during the Merge/Morph process, the program will check to see if all the layers are there and insert new copies of the missing layers into the file, making it compatible with the Compass and Walls. Be sure to leave the Exporter running when you finish the export in case you need to make changes. |
|
E. Check The Shot Positions. You should now open the newly created merge file in your drawing program and check that shots are in the right position relative to the passage outlines. Since we haven't integrated your drawings with the newly installed layers, you may have to turn layers on and off to be able to compare the positions of the passages and the walls. |
|
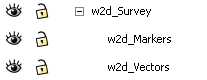
The shot-lines and station markers appear under the "w2d_Survey" layer in the w2d_Markers an w2d_Vectors layers. Be sure all three enabled. You also may have to disable any obscuring layers, such as the w2d_Background layer. |
|
If the passage shot-lines don't match passage outline position, try adjusting the positions in the Exporter and re-merging the data. Keep doing this until the passage shot-lines are in the right position. |
|
D. Put Drawings In The Proper Layers. The final step is to put the all your drawings, symbols, text and information into the proper layer. Since each layer has a different role, you want to put certain drawing elements into certain layers. For example, you want to put all your passage outline drawings in the w2d_Walls_shp layer so the Exporter will warp the passage properly if the cave data changes.
To move the your data into the layer you will be using cut and paste operations. The detail vary between drawing programs. Generally speaking, you want to select a portion of your drawing and then cut it. Next, select the target layer and then paste. You do this repeatedly until all the drawing elements have been moved. (Click here for a description of the process in Inkscape.
To determine which layers you should use for different parts of your drawing, refer to the following detailed description of the SVG Layers used for cave drawings.