After the Compass Sketch-map Editor has been installed, there should be an icon on your desk for the Sketch-map Editor. To start the program just double click on the icon.
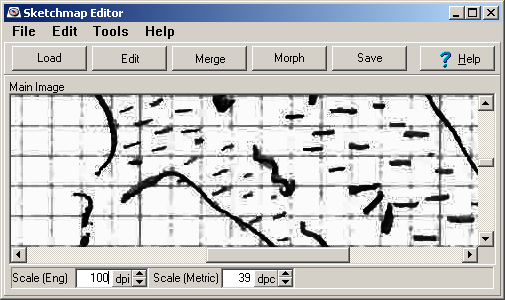
When the program is first started, it displays the Main Window. The Main Window, provides a home base for all the editing operations. All the separate tools in the Sketch-map Editor can be access from here. Here is a list of all the option that are accessible from the window:
1. Load Button. The Load Button allows you to open an image or bitmap file for editing. Many different file formats are supported including TGA, GIF, PNG, JPG, TIF and BMP. |
|
You can also open files from the "File" option on the menu bar. Finally, the program saves the names of the last 5 files that you opened so can return to them quickly. You can select any of these previous files by going to the "File -> Reopen" option on the menu bar.
2. Edit Button. The Edit Button takes you to the Edit Tools. The Edit Tools allow you to edit the currently loaded image image. The Editor can scale, rotate, clip, fill and draw on the image. It can also adjust attributes like brightness, contrast and gamma. Finally, it can convert color images to black and white.
3. Merge Button. Pressing the Merge Button takes you to the Merge Tool. The Merge Tool allows you to combine or merge any number of images into a single image. The white parts of the merge image can be made transparent, so it is easy to see how to align the images for merging.
4. Morph Button. The Morph Button takes you to the Morph Tool. It allows you to adjust or morph the positions of survey stations in the sketch so they match the positions in the survey data.
5. Save Button. The Save Button allows you to save the currently displayed image to an Image file of your choosing. Generally speaking, you should save your work periodically so it won't be lost in case of a power failure or a computer crash.
6. Internal Scale. The Internal Scale boxes appear at the very bottom of the window and they show the internal scale of the bitmap image. When you load an image, the program reads the internal scale from the bitmap. When you save the image, these values are copied into the bitmap. This only works with Windows-style, BMP bitmaps. Currently, it does not work with JPG, GIF, PNG or TIFF images.
Setting the internal scaling may be useful when you read the image into a drawing program. Some drawing programs use these values to scale your sketch map to match other objects in your drawing. Some drawing programs ignore the internal scale of a bitmap. In which case, you will need to manually scale them in the drawing program, usually by stretch the image to match the passage shot lines in your map. Specifically, Adobe Illustrator takes into account the scale information in BMP files, but Inkscape does not.
Generally, you want to set the scale to the same value you used when you measured and set the scale.