The Set Size tool is available from Editor Menu bar under the "Tools - Flip/Rotate" option. It is also available in the Merge Tool's menu.
The Set Size tool changes the size of the image without scaling the image itself. It is normally used to expand the image to make room for more drawing. For example, when you Morph the image, the morphing process may tend to move the image beyond the edge of the bitmap. You can also use the tool to decrease the size of the image, but the Trim Tool is easier to use for this purpose. (If you want to change the image size and scale the contents of the image, you should the Scale Tool.)
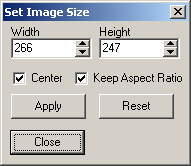
There are several options in the Size Tool:
|
|
1. Width and Height. These two options set the size of the resized image.
2. Keep Aspect Ratio. When this option is enabled, the ratio of the width to height is kept the same as the original image. For example, if the original image was 100 x 200 and new size might be 200 x 400.
3. Center. When this option is enabled, the image is expanded or contracted around the center. For expansion, this would mean that new space would be added equally along the left, right, top and bottom of the image. If the option is disabled, the new space would be added along the right and bottom of the image.
4. Apply Button. When you have selected the proper size, pressing the "Apply Button" will change the image size.
5. Reset Button. Pressing the Reset button, restores the Width and Height value to their original settings. |
|