Preparing Sketch-maps. Most cave cartographers map the floor detail and passage walls through small, hand-drawn sketches of the cave. Depending on the size of the passages, each sketch typically has three or four shots, so there may be dozens of sketch-maps for each survey. The image to the right is a typical example from the 1987 survey of Fulford Cave.
These images can be scanned into a computer and then traced in a drawing program such as Inkscape or Adobe Illustrator. They can also be manually traced. Unfortunately, inconsistencies in the scaling and rotation can make the process tricky and difficult. In addition, working from dozens of small maps can make the tracing process tedious. Finally, small errors in the sketch-maps can put the stations in the wrong place relative to the plot of the cave, forcing the cartographer to fudge the positions manually.
To solve these problems, the Compass sketch-map Editor allows you to scale, rotate, merge and morph the images to match the true positions of the survey stations. To help you get acquainted with the process, I have written this tutorial that will walk you through the whole process.
Sketch Map Editor Tutorial. The Compass Sketch-Map Editor is a set of special tools designed to prepare your sketch-maps for manual tracing or digital tracing in programs like Inkscape or Illustrator. To illustrate this process, we will walk through the process of editing sketch-maps for the "B" survey in Fulford cave. (Fulford is a wild cave in Colorado that is on Forrest Service land and open to the public. The Compass distribution contains a copy of the Fulford Cave survey data. )
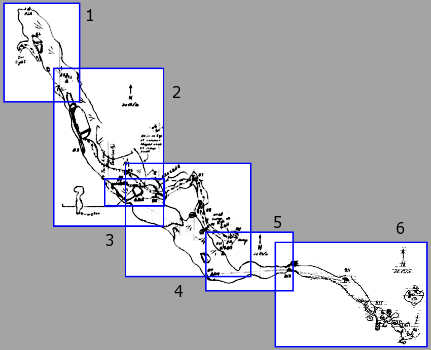
Overview. The "B" survey in Fulford consists of six sketch-maps that cover about 670 feet of passage (200 m). The image to the right shows how all the images should be combined to form a single, continuous image that makes it easy to trace the passages when we make the final drawing.
The process consists of six steps:
1. Scale. In this step, we adjust the images so they are same scale and at a useable size.
2. Trim. In this step, we will trim off excess parts of the image, so we only have the passage and floor detail.
3. Rotate. In this step we remove any residual rotation so the passages are perfectly aligned to north.
4. Preliminary Morph. In this step, we do a preliminary morphing of the passage. Morphing adjusts the image to match the survey station positions. The morphing process smoothly moves the passage walls and floor detail so they track the survey station positions. Doing a preliminary morph on each individual image reduces the amount of distortion produced in the final morphing step.
5. Merging. In this step we merge all the images together to form a single, continuous bitmap.
6. Final Morphing. In this step, we morph the combined image to match all the station positions in the survey.