The Color-By-Section and Color-By-Survey options allow you to plot parts of the cave using different line patterns, These include combinations of dotted and dashed lines as well as user definable lines. This is useful for differentiating between different surveys or sections of the cave, especially when the plot is printed in black-and-white colors.
The Color-By-Section and Color-By-Survey grids have columns that show the line pattern for each section or survey. To use a line pattern with you select one of the patterns using the Line Pattern drop-down box.
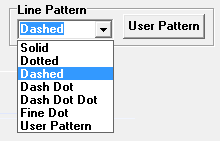
You then highlight one or more survey or section row and press the "Set Button" at the top of the Pattern column. The line pattern for the survey or sections will change in both the grid and plot itself.
Stock Patterns. There are seven patterns that can be selected. Here is a magnified view of each one:
Name |
Example |
1. Solid. |
|
2. Dotted |
|
3. Dashed |
|
4. Dash Dot |
|
5. Dash Dot Dot |
|
6. Fine Dot |
|
7. User Pattern |
|
User Patterns. You have the option of using custom patterns. These are especially useful when you're printing to printer. Printers can have very high dot resolutions which can make the dotted/dashed lines difficult to see. Using custom patterns allows you to create unique patterns or
To create a custom pattern, press the User Pattern button. The Line Pattern dialog box will be displayed:
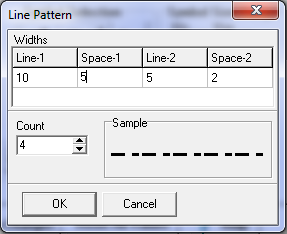
A dotted/dashed lines are created by specifying the width of the line and space portions of the line. For example, in the dialog box above, the pattern of lines and spaces 10, 5, 5 and 2.
This means that the line consists of a line portion that 10 units wide, a space portion that is 5 units wide, a line portion that is 5 units and a space portion that is 2 units. An example of the corresponding line is displayed in the "Sample" sections.
You can specify anywhere from 2 to 16 widths by changing the "Count" value. Generally, the count should be even multiples of two, otherwise you may get odd patterns between the end of one segment and the start of the next.
Saving Patterns. The current user pattern can be saved and restored along with all the other complex settings. You do this using the "Load All Settings" and "Save All Settings" buttons on the Complex Options Page.
Pattern Problems. Note that when you are fully zoomed out, the Dash pattern my seem to disappear. This is because the dashes maybe longer that the survey shot. If this true, the dash part of the pattern will take up the entirety of shot, which means there is no room for the spaces between dashes. To solve this problem, choose a finer pattern with smaller dashes.