The Passage Walls page controls how the passage models are drawn. Since Compass can produce very complex passage modeling, those option are available here. However, for SVG export, most of the time, only the simpler modes are needed. More complicated complex models slows the display and make the SVG File larger, particularly on a big cave. As a result, the program defaults to the simplest possible passage model .
Switching to a more complex mode can make the passage outlines slightly smoother if you are in plan mode. However if you are generating a profile, switch to a more complex mode can make the outlines much smoother.
For profile mode, I would recommend that you set the passage shape "Octagon". I'd also recommend that you set the "Rounding Depth" to "Two Pass". This will make the passage outlines much smoother.
The 3D Modeling Page displays options that control the way 3D passages are displayed. Basically, they control how realistic the passages are. In order to display more realistic passages, the program must draw more faces, which takes more time. As result, for larger caves, you may want to use one of the simpler modes to speed up the display. For SVG Export, the more complicated modes add very little to the exported map except in Profile mode. Here is a description of all the options: Polygons Rendered: This item displays the number of polygons required to display the cave. It is a measure of the complexity. Some modes double or quadruple the number of polygons. For large caves, it is best to keep this number low, especially for SVG Export. Merge Passages. This option merges the end of one passage with the beginning of another. This makes the passage walls smooth and seamless, with no breaks or gaps. It also increase the number of polygons and makes the SVG bigger Seal Passage Ends. This option closes the ends of open passages. It is of little use in SVG export except perhaps in Profile mode.
|
|
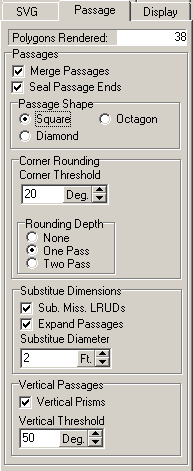
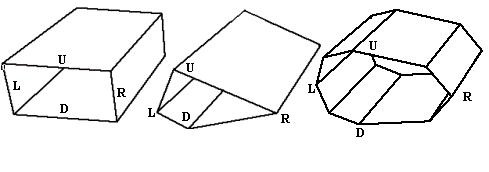
Passage Shape. This option allows you to control the cross section shape of the passages. The Square options constructs square passage shapes. The Diamond option constructs diamond shaped passages. The Octagon option constructs eight sided passage shapes. The octagon shape produces smoother more realistic passage models, but there are also twice as many faces so it produces a larger file and make very little difference in the appearance of SVG, except in Profile mode. In profile mode it may give you a smoother profile to trace from. Corner Rounding. Corner Rounding works by subdividing the passage at passage corners. By adding extra segments at the corners, the program produces a smoother, more natural appearance to the corner. There are two Corner Rounding options: 1. Rounding Depth. This option controls the amount of corner rounding that is applied. If the option is set to "One Pass", the program adds one short segment of passage to round the corner. If the option is set to "Two Pass", the program adds three short segments of passage to round the corner. 2. Corner Angle Threshold. Corner Rounding is only necessary when the corner is sharp. Without corner rounding, sharp corners look unnatural. On the other hand, if the corner isn't too sharp, the program can just connect the passages and the corner will look completely natural. The Corner Angle Threshold is used to determine the threshold at which the program will begin rounding. For example, if the angle is set to 20 degrees, only corners that turn more than 20 degrees will be rounded. Substitute Dimensions. In many instances, survey data will be missing the Left, Right, Up and Down measurements (LRUDs) that defines the size of the passage. Without these dimensions, the program will be unable to construction a passage model and there will be blank spots in the cave image. For this reason, the program allows you to substitute other dimensions for the missing measurements. Here is a description of the options: 1. Expand Passages. This option handles the situation where a passage dimension is missing because there is a side passage intersecting the main trend. Surveyors normal mark this down as “Passage” and omit any measurement. If the “Expand Passages” option is enabled, the program will look at the surrounding LRUDs to find the nearest valid value. This value is then substituted for the missing information. 2. Substitute Missing LRUDs. This option handles the situation where all the LRUDs are missing from a survey. This makes it impossible for the program to find a substitute LRUD nearby. When the “Substitute Missing LRUDs” the program substitutes a default dimension for each missing measurement. 3. Substitute Diameter. This option set the default to be used when LRUDs are missing. Vertical Passages. When a passage is near vertical, the normal Left, Right, Up and Down dimensions cease to have meaning. For example, in a vertical shaft, the Up measurement would be the entire vertical extent of the pit. As a result, cave programs can have problems displaying vertical passages. For this reason, the program has options that allow it to deal with vertical passages differently. Here is a description of the options: 1. Vertical Prisms. When this option is enabled, the program treats the Left, Right, Up and Down measurements as West, East, North and South respectively. This creates a much more realistic passage model. 2. Vertical Threshold. This option sets the angle at which the program treats a passage as vertical. Vertical Passage Prisms. Surveyors normally collect Left, Right, Up and Down (LRUD) measurements at each station. However, as the passage gets steeper, the LRUDs ceases to have meaning. For example, what does an Up measurement mean on a vertical shot? For this reason, the Viewer gives you the option of treating Left, Right, Up and Down measurements as West, East, North and South respectively. To enable this options select the “Vertical Prisms” option. Since this option should only be applied to vertical passages, you have the option of selecting how steep a passage should be before it is considered vertical. To set the value, set the “Threshold” value. The Threshold is measured in degrees. Generally, you want to choose a passage angle of between 45 and 75 degrees for the options to take effect. As the inclination of a passage exceeds 45 degrees, the passage shape distorts and so it is necessary to treat the LRUDs as East, West, North and South. |