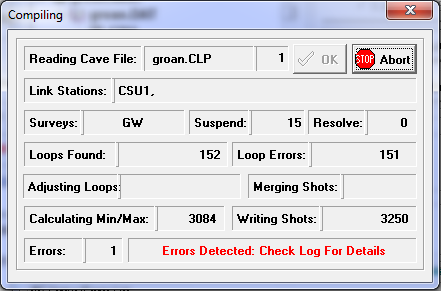
As the Compiler processes a file, the program displays a progress screen that shows you what operations are being performed on the file. Files are processed in several stages, so there are several different items displayed:
1. Reading Cave File. This item displays the name of the current file being processed.
2. File Count. Just to the right of the File Name display is an unlabeled cell that shows the number of files that have been processed.
3. Link Stations. This is a list of the stations that have been used to link files together when processing multiple files.
4. Surveys. This is the name of the current survey being processed. |
|
5. Suspend. This item displays a count of the number of suspended items encountered. Suspended shots are shots that don't connect to the rest of the cave at the time they are initially processed. The program saves them for later processing.
6. Loops. This item displays a count of the number of loops encountered.
7. Resolve. This item shows the process of resolving suspended shots. Each time this number changes, the compiler is trying to resolve another suspended shot. Since suspended shot often depend upon other suspended shots before they can resolve, it may take several passes through the suspend list before all shots will resolve.
8. Min/Max. This item shows the compiler searching for the top, bottom, eastern, western, northern and southern extents of the cave.
9. Closures. This item shows the compiler locating all of the stations in survey loops.
10. Writing Shot. This item shows the compiler writing shots to the PLT file. This is the final stage of processing.
11. Errors. This item shows the number of errors that were encountered during the compiling operation.
12. Error Information. The unlabeled cell to the right of the error count shows more detailed error information. If the compiler encounters any errors during processing, a warning bell will ring, but the program will continue to compile. If errors were detected during a compile and you have selected the Pause On Error option, the progress box will stay on the screen after the compile.
If the process was successful, the progress screen will disappear at the end of the compile and, depending on which operations you have selected, the Project Manager may move onto displaying the cave with the Viewer. Once a cave has been processed, you can view error information and statistics.
Aborting. You can also abort the compile process by clicking the mouse on the "Abort" button in the progress screen. If you abort a compile, the compile process is terminated and the no PLT file is generated.
