The Capture Page contains all the tools you need to capture images and convert them into a movie or slide show. Here are detailed descriptions of the movie creation process using these tools:
I. Adding Movie Frames. Movies are created by saving a series of images of the cave into memory. Once the images are saved to memory, each image can be instantly displayed on the screen. By rapidly playing back a sequence of images, you get a motion picture of your travels around and through the cave.
Capturing Images. The process of creating a movie is easy. You begin by finding a starting view for the movie. Just zoom, pan or rotate the cave until you have a good starting position. You then click-on the "Add Frame" button. This will save the first image to memory. Now, you repeatedly zoom, pan and rotate, and save each new image. Generally, you want to make small changes between each image. Otherwise, the movie will be jerky. |
|
Frame Delays. When you add a frame to a movie, the program plots the image into memory instead of onto the screen. If the cave is large, the process can take several seconds. The "Hour Glass" cursor will stay on the screen until the process is complete. You cannot abort the frame creation process with the mouse button like you can other plotting processes. This is because if the process is interrupted, the movie frame will be incomplete. As you add new frames to your movie, the program will count the frames and display them in the "Used Frames" display box.
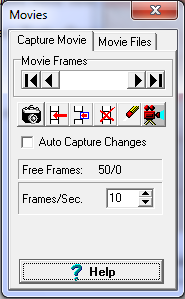
Frame Memory. The program allocates memory for the movie one frame at a time. The total number of frames available for your movie is dependent on the amount of free memory available on your system. This means that the number will vary depending upon how many other programs are running and how Windows is configured. The maximum number of free frames is displayed in the "Free Frames" display box. The number of free frames is a function of the amount of memory on your system and the version of Windows you are running.
II. Auto Capturing Frames. The process of making a movie can be tedious because you have to repeatedly make small changes to the image and then press the Add Button. For this reason, the Viewer has an option that automatically saves every change to the image as a movie frame. This makes it much easier to create complex movie sequences.
Enabling Auto Capture. To begin capturing images, enable the “Auto Capture Changes” option in the Movie Window. Once the option is enabled, the Viewer will save every newly plotted image to the accumulating movie. This way, you can create a movie using the normal zoom, pan and rotate options. You can also use the Drag options to generate smoothly changing zooms and pans. The Auto Capture option is automatically disabled whenever you exit from the Movie Window or when the Frame Limit has been exceeded.
The best quality movies are created when you set the Increments to small values and make small changes. If you are using the Drag options, move the mouse slowly so the changes are small and smooth.
Complex Motions. One limitation of the Auto Capture option is the fact that you cannot do two motions at the same time. For example, you cannot rotate and zoom simultaneously. This is because a new image is created after each operation. For this reason, it is often useful to disable the Auto Capture option for part of your movie. When the option is disabled, you can combine more than one motion in the same frame. For example, you could press the rotate and zoom buttons in sequence, and then press the Add button. This will result in the two actions being combined in a single frame.
III. Editing Movie Frames. Once you have captured some movie frames, you can edit the movie to correct any problems.
The Movie Frame Contol. The Movie Frame Control allows you to select individual frames for editing. The number in the center shows the current frame number. If no number is displayed, no frames have been captured. Pressing the left and right arrows move you backward and forward through the frames. The Left and Right arrows with Bars allow you to move to the beginning or end of the movie.
In this way, you can step through the whole movie one frame at a time and the select a frame for editing. As you step through the movie frames, the display will change, showing the image that is associated with the current frame.
Editing Operations. Once you have selected a frame you wish to edit, you can perform three different operations on the frame:
1. Overwrite. The Overwrite Button causes the current cave plot to overwrite the selected frame. This allows you to replace any existing frame with a new image. Note: when you are playing movies, the current cave plot is no longer visible. Before you overwrite a frame, click the Redraw Button to view the cave image that will overwrite the existing frame.
2. Insert. The Insert Button causes the program to insert the current cave plot in the frame just before the current frame. This allows you to insert additional images anywhere in the movie without overwriting any existing image.
3. Delete. The Delete Button deletes the currently selected frame. This allows you to remove one or more frames from your movie.
IV. Movies Playing Movies. Once you have accumulated a number of images, you will want to play the movie to see if you are capturing the movie sequences you want.
Playing. You can start playing back the movie by hitting the "Play Movie" button. Each image will be displayed on screen in sequence. You can control the playback speed of movies by changing the "Frames/Second" box. This value controls the number of frames per second the movies are played back. Note. The speed of your computer and video card may limit the number of frames per second.