There are several Tool Bars that control the operation of the Project Manager and allow you to manipulate the Project Tree. They each contain a set of button that allow you to perform important operations quickly without the need to hunt through menus. The buttons may be grayed out if the operation is not applicable to the state of the project or the object selected in the Project Tree.
Arrow Buttons. The Arrow Buttons allows you to move the selected Data Files and Folders around in the File Tree. If more than one item is selected, only the first item is moved.
![]()
1. Up/Down Arrows. The Up and Down arrows move the selected item up within a particular level. For example, if a data file is inside a folder, the Up/Down arrows will move the file up/down within that level, but won't move it outside the level.
2. Left Arrow. Pressing this button will move the selected item up a level if it is inside a folder.
3. Right Arrow. Pressing this button will move the selected item down a level. This only works if the item immediately above it is a folder. In other words, you must move an item just below a folder before you can move it inside the folder.
The Top Tool Bar. The top tool bar contains buttons that control global operations of the Project Manager. Here is an image of the top tool bar:
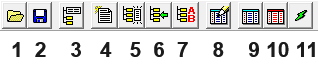
1. Open Project. Pressing this button allows you to open a Project (*.mak) or a cave survey file (*.dat) for processing and display.
2. Save Project. This button is only applicable if the project has been modified and needs to be saved. Pressing the button will save the project under the current name.
3. Project Settings. This button is only applicable if a project file has been selected in the file tree. Pressing this button allows you to set a Base Location and override other file-level and program-level setting for a project. Click here for detailed information about Project Settings.
4. Create New File. This option creates a new stand-alone, survey file that is not associated with a Project. Click here for details on creating a new file.
5. Insert New File In Project. This button is only applicable if are working on a project file and the project or a data file has been selected in the file tree. Pressing this button allows you to create and insert a new survey file into the Project. Click here for a detailed instructions about creating and inserting a new file.
6. Insert Existing File In Project. This button is only applicable if you are working on a project file and the project or a data files has been selected in the file tree. Pressing this button allows you to create and insert an exiting survey file into the Project. Click here for a detailed instructions about inserting an existing file.
7. Insert New Survey. This button is only applicable if a data file has been selected in the file tree. Pressing this button allows you to insert a new survey in the selected survey file. Click here for detailed information about inserting new surveys in existing files.
8. Edit File Properties. This button is only applicable if a survey file is selected in the file tree. Pressing this button allows you to Edit a file's properties and change things like fixed stations and filenames. Click here for detailed information about using the File Properties Editor.
9. Display Statistics. Pressing this button displays statistical information about the most recently processed project or survey file. Click here for detailed information about viewing cave statistics.
10. Find Blunders. Compass has several tools that can be used to locate blunders in the survey data. Pressing this button displays blunder information about the most recently processed project or survey file. Click here for detailed information about viewing blunder information.
11. Compile Only. Pressing this button compiles the cave without displaying a line plot of the surveys. This is useful when you making changes to the data and you to check for errors.
The Side Tool Bar. The side tool bar contains buttons that are used to manipulate the project tree.
|
1,2. Expand/Collapse Tree. Pressing one of these buttons will expand or collapse the file tree. Expanding the tree enables you to see all the details and subitems in the tree. Collapsing the tree, allows you to see an over view of the project.
3. Delete. This button is only applicable if a survey file or a folder is selected in the file tree. You cannot delete surveys. They can only be deleted inside the Survey Editor. Pressing this button deletes the selected file/folder. Click here for detailed information about deleting files.
4. Insert A Folder. Pressing this button inserts a Compass folder into the tree. Click here for detailed information about Compass Folders.
|

5. Search. Pressing the Search button allows you to search through the file tree for the name of any Survey File, Folder Name or Survey name.
6. Rename File. This button is only applicable if a project file or a data file has been selected in the file tree. Pressing this button allows you to rename the selected survey or project file. Click here for detailed information about renaming files.
7. Undo. Compass saves the state of the file tree each time you make a change. Pressing the Undo button undoes any changes you've made. Compass save up to 1,000 changes, so you can undo as many as 1,000 changes.
8. Redo. Pressing this button "redoes" the last operation that was undone by the Undo button.