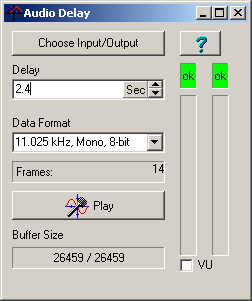
1. Data Format. Begin choosing a data format.
a. Sample Rate. Sample Rate controls
the frequency response of the audio delay. The higher the sample rate, the
higher the frequency of the audio dleay Generally you will have choice of at
least 3 sample rates:
11.025 kHz - AM Radio Quality
22.05 kHz - FM Radio Quality
44.1 kHz - CD Quality
If you are connected to an AM radio, you should the 11.025 kHz setting. Using
a higher setting will accent the noise and static found on AM radio. Likewise,
you may want to use 22.05 kHz for FM radio, although you still may end up
accenting high frequency noise. The 44.1 kHz sample rate is almost never used
for radio applications
|
|
b. Mono/Stereo. If you are using AM
radio you will always use the mono option. If you are using FM radio and have
the proper jacks, you can use a
stereo option.
c. 8-Bit/16-Bit.
This option controls
the dynamic range of the audio. Dynamic Range is the range of loudness between
the softest and loudest sounds. In almost all applications, 16-bit is the
preferred option since it produces more realistic and natural sound.
2. Adjust Volume. Make sure all your
cables are plugged in and the delay is set to 0.1 seconds. Turn on your
radio and press the "Play" button. Turn up the volume on the radio until you
hear sound. (If you don't hear sound, check your
cables, adaptors and jacks and make sure they are plugged in the Line Input.
Also check your computer's configuration
making sure the Line Input and the SW output are not muted and their volume
controls are turned up at least half way.)
Now check the VU check box in the lower right corner. You should see the
audio levels graphically displayed just above the check box. Turn the radio
volume up until it almost reaches the top. The box at the top should always be
green and never red. If the box turns red even for a fraction of a second, the
audio is too high and will be distorted.
3. Adjust Delay.
Your Television
Signal can take many different paths to reach your receiver. For example, it may
travel by satellite and each satellite bounce adds about a second of delay.
Also, many live events have 5 second delay so that the broadcast crew can catch
any obscene language or gestures that might be caught accidentally on camera.
Finally, digital TVs introduce their own delays.
Radio is different. It is usually sent directly to the broadcast station and
transmitted immediately. That means there is practically no delay in the signal.
What the Audio Delay program does is delay the radio sound so it matches the
delay of the Television and is synchronized with video stream.
The final task is to adjust the Audio Delay program so the delays exactly
match the television.To do this, press the Play Button again to disable
playback. Next, increase the delay to about 2.5 seconds. This is the typical
delay for off an air broadcast with no satellite delay. Now re-press the Play
Button. There will be a 2.5 second delay before the audio starts playing. Watch
the television while listening to the audio. If the audio is a head or behind
the video, repeat the steps above, adjust the delay up or down, until the audio
is in sync with the video. Remember in some cases the delay may be more than 10
seconds.
| 
