|
|
|
Trouble Shooting.
|
| H. Trouble Shooting.
Occasionally, you find that the program has
not adjusted your map properly. The causes of these problems are
relatively easy to correct. Here is a list of common issues.
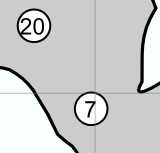
1. Some Drawing Elements Aren't Adjusted.
If you notice that some drawing
element are no moving when the cave shots have moved, it
probably indicates that the elements were placed on the wrong
layer or aren't in any layer.
If an element of your drawing is placed in the
wrong layer, the object may not be treated the way you expect to
treated. For example, it move without being warped. Also, if the
element is outside of all the layers, the program will not
adjust the aspect of your drawing at all. In Inkscape, you can
test what layer the object is in by selecting it and the looking
at the Layer List. (There is detailed information about this in
the Inkscape
Tutorial.) If part of your drawing is in the wrong layer,
you can cut and paste the object back to the right layer. Click
here
for
detailed information about the process. |
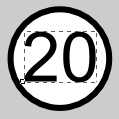
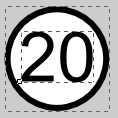
| 2. Objects Shift Relative To
Each Other. Any drawing elements that
need to move together, should be "Grouped." If they are not
grouped, the may shift relative to each other because the
morphing process will treat them as separate element and may
move them slightly different amounts. For some this wouldn't
matter because the difference wouldn't be visible. However other
items it is very important. For example, the "20" in top
"Circle-Height" in the image to the right is slightly off
center, while the lower one is not. This is because bottom one
is grouped while the top one is not.
Different drawing programs have different procedures for
grouping items. Here are instructions for doing it in Inkscape |
 |
| To
group items in Inkscape, first make sure you are editing the master
drawing, not one of the test files. Begin by selecting the Node Tool |
 |
| Next click on one of the items you
want to group. If one item is inside the other, click on
the inner one first. A small box will appear around the
object. Now how down the Left
Shift Key and click on another object. A second box
should appear. |
 |
|
|
| Maintaining the Left
Shift-Key down, do this for all the objects you want to group.
When you have selected all the objects, select the "Object ->
Group" option from the menu bar. All the separate dotted lines should
disappear and the whole object should be enclosed in one single box or
dotted lines. This indicates that the all objects have been grouped. |
|
|
|
|

