|
Inkscape Tutorials. This section contains tips and
techniques on using Inkscape for drawing cave maps. I get a fair
number of questions about using Inkscape for cave maps and I
thought it would be useful to archive some of the answers as
tutorials so everyone can benefit from the answers. Although
Inkscape is fairly similar to Adobe Illustrator, but there are
many differences and there are some tricks that can make the
process of drawing maps easier. As Compass users and I discover
new tools and tricks for using Inkscape, I will post them here
so everyone has access:
| I. Drawing Drop-Off Symbols. In
this section I'll talk about creating "drop-off" symbols
and how to bend them around to match their configuration
of a specific cave map. The same technique can be used
for any other cave symbol that needs to by positioned,
rotated and warped to match the passage. |
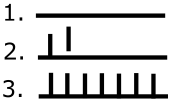
A. Draw the basic
symbol. Using the "Beizier Tool"
 , draw a horizontal line. The line must be
horizontal to start with, but you can later rotate,
warp and reposition the final symbol. Next draw each
of the vertical bars so it looks something like the
image to the right. To simplify the process, you can
draw one line and then copy, paste and drag the rest
of the lines into position. This insures that they
are all the same length.
, draw a horizontal line. The line must be
horizontal to start with, but you can later rotate,
warp and reposition the final symbol. Next draw each
of the vertical bars so it looks something like the
image to the right. To simplify the process, you can
draw one line and then copy, paste and drag the rest
of the lines into position. This insures that they
are all the same length. |
|
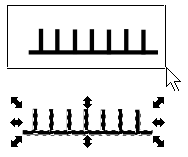
B. Group The Parts.
Using the "Selection Tool,"
 drag a box around all the lines in the symbol. This
will select all the symbol's lines at once. Next,
select the "Object->Group" option from the menu bar.
This will group all the individual lines into a
single object. (If you want to makes sure all the
lines have exactly the same widths, styles and
colors, you can use the "Path->Combine" option to do
almost the same thing. )
drag a box around all the lines in the symbol. This
will select all the symbol's lines at once. Next,
select the "Object->Group" option from the menu bar.
This will group all the individual lines into a
single object. (If you want to makes sure all the
lines have exactly the same widths, styles and
colors, you can use the "Path->Combine" option to do
almost the same thing. ) |
|
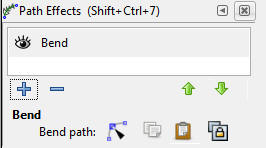
C. Bending The
Symbol. Select the "Path->Path Effects" option
from the menu bar. This will display the "Path
Effects" dialog on the right. Next, select the
drop-off symbol. Press the "Plus" button and choose
the "Bend" effect from the list of effects. Finally,
in the "Bend path" section, press the "Edit
on-canvas" button.
 (Note: Although it looks the same, this button is
different from the regular "Node Select" tool.)
(Note: Although it looks the same, this button is
different from the regular "Node Select" tool.) |
 |
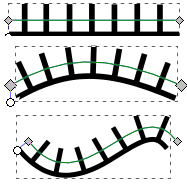
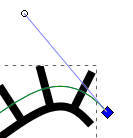
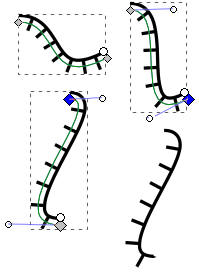
| When you do this a
green horizontal line will appear running through
the symbol. You can now drag the green, horizontal
line to bend the whole object along an arc. You can
bend it on a double curve by pulling the line at
seconds point. For example, the double curve to
right was created by pulling down on the line near
the left side and pulling up on the line on right
side. Note: if you have problems grabbing
the line, you've probably switched modes. Reselect
the symbol with the Selection Tool
and then press the press the "Edit on-canvas"
button.
in the "Bend path" section of the Path-Effects
dialog on the right. |
|
| D. Controlling the
Bends. If you click on the square box at the end
of a line, a "Control-Line" with a circle at the end
will appear. Dragging the circle will allow you to
more precisely control the shape of the bend.
Note: Because of a bug in Inkscape, you must
hold down the Shift-Key while dragging the
control-line. Otherwise, the control-line will
suddenly snap into the wrong position.
|
|
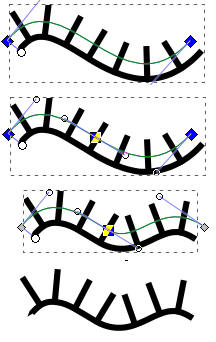
E. Complex Bends.
You can insert additional bend-points in the
green line to bend the object in more than two
places. To do this, click directly on the green line
to select it. This will cause the boxes at both ends
of the line to be highlighted blue. Now press the
"Insert New Node" button
 on the top tool bar.
This will insert a new
bend-point in the middle of the line. With the new
bend point you can now bend the line in three
places. By manipulating the control-lines for each
bend-point, you can control the exact shape of three
bends. (Remember to hold down the shift-key when
moving the control-lines.)
You can insert as many bend-points as you want.
The more bend-points, the more complex the curve can
be. The example on the bottom right show a drop-off
symbol with three bends. |
 |
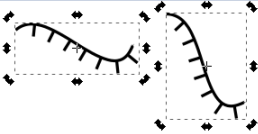
| F. Rotation.
Once you have the exact shape you want, you'll want
to rotate the symbol into the proper orientation.
You can rotate the symbol by clicking on the symbol
twice with the Selection Tool.
This will put rotation-handles around the outside of
the symbol. Dragging the handles will rotate the
symbol to any position. There are other methods of
partially rotating the symbol, but this method is
preferable because it doesn't distort symbol in any
way. |
|
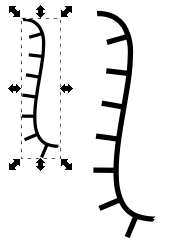
| G. Positioning and
Scaling. Once you have rotated the symbol to the
proper orientation, you can drag the it into its
final position and scale the symbol to fit the size
of the passage. To position the symbol click on it
once with the Selection Tool,
then drag it into position. To scale the
symbol, drag the small arrows that appear around the
object. The horizontal arrows scale the object
horizontally. The vertical arrows scale vertically
and the corner arrows scale both directions at once.
If you want to scale the object evenly both
horizontally and vertically, hold down the
control-key while you are dragging. With the
control-key down, you it doesn't matter which arrows
you drag, they all scale evenly in both directions. |
|
| H. Final
Adjustments. The final adjustments can be done
by dragging the end points of the "bend-line."
Reselect the symbol with the Selection Tool
and then, in the "Path Effects" dialog on the right,
press the press the "Edit on-canvas" button.
in the "Bend path" section. This will redisplay
the green-line. You can now click on the square
boxes at the end of the line and drag the ends of
the symbol into position. (Be careful to only drag
the square boxes; otherwise the shape will be
distorted.
The symbol will be stretched or shrunk and
maintain its general shape. If you move the
end-points too far, you may need to reshape the
object by dragging the circles at the ends of the
control lines. |
 |
| I.
Finishing Up. To get the symbol perfectly
positioned, you may need to repeat some or all of
the previous steps. Once you get a feel for how all
the different tools and options work, you'll be able
to use only what you need to get the job done. |
J.
Symbol Libraries. To save yourself the hassle of
redrawing the cave symbols every time you need one,
Inkscape allows you to create symbol libraries.
To create a symbol library,
you generally draw all your
symbols on a blank page. You
then label each drawing and
convert them into a symbols.
Finally, you save the symbol
drawings to a specific
directory. Once the symbols
have been saved to the
proper directory, they will
be loaded into the symbol
library dialog every time
Inkscape runs so they will
The following video tutorial
shows you how to convert the
drawings to symbols, name
them and save them so they
are available every time
your run Inkscape:
|
|

