|
COMPASS For
Windows |
|
|
|
Getting COMPASS
|
|
|
|
Download/Install Issues
|
|
|
|
Registration
Information |
|
|
|
Auxiliary Tools/Information |
|
|
|
Tutorials - (New) |
|
|
| Links |
|
|
|
Documents/White Papers |
|
|
|
COMPASS For DOS |
|
|
|
MISC. |
|
|
|
|
|
|
|
|
|
|
Drawing An Outline
Without a Sketch-map |
Tracing LRUD Outlines. If
you are working with a cave or a portion of a cave that does not have a sketch
map, you can still draw the passage outlines using the LRUD values from the
survey data. Compass constructs 3D passage models from the survey data. Assuming
the survey has LRUD data, you can use the Compass passage models to draw passage
out lines. The following section describes the process in detail.
| 1. Show Passage Data.
Compass exports passage wall information to the SVG file in two ways.
The first method displays the Left, Right, Up and Down (LRUD) distances as
simple lines from the survey station to the walls. In the second method, Compass
constructs a complete 3D model of the passage walls from the LRUD data.
You can enable either one or both of the methods to construct your
passage outlines.
|
|
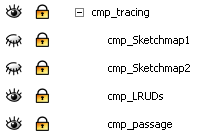
To display either type of passage information,
enable and expand the "cmp_tracing"
layer. Next, disable the "cmp_Sketchmap1" and "cmp_Sketchmap2" layers.
Next, enable the "cmp_LRUDs" or the "cmp_passage" layers, depending on
your preferences. For the tutorial, we will be using the "cmp_passage."
Finally, since we will not be modifying any of these layers, you will
probably want to lock all of them so they won't be accidentally
disturbed while we aer working. |
 |
| 2. Select the Drawing Layer.
We want to put our
hand-drawn passage outlines in the "w2d_Walls" under the "w2d_walls_shp"
sub-layer. (This layer can be morphed to reflect changes in the
positions of survey stations.) To do this, expand the "w2d_Walls"
layer and
highlight the "w2d_walls_shp" sub-layer. |
 |
| 3. Zoom Into The Cave.
We want to
zoom in to the image to make it easier to draw the passage outlines.
We do this by selecting the "Zoom Tool" on the left side of the window.
When the Tool is enabled, each click on the drawing zooms and centers
the image on that point.
|
 |
| You'll want to zoom in on the part of the
cave where you will start your drawing. If the cave is small and you are
just starting, this will probably be the entrance of the cave. If you
are working on a particular survey, this will be the beginning of that
survey. The idea is that you want to zoom so you can see two or three
shots. Click a few times on your starting point until the cave is zoomed
to the level you want.
|
| 4. Select The Bezier Tool. We are going to be
drawing smoothly curving lines so we need to use the Bezier Tool that
can be found on the tool bar on left side of the screen. Click on itl once so
the button is down. |
 |
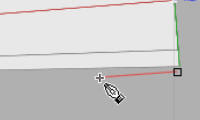
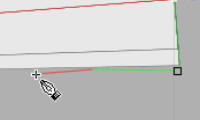
| 5. Trace A Passage Segment.
We are going to draw the outline by clicking a series of points around
the edge of the passage outline. Choose a point near the starting point and
click. Now move the mouse along the edge of the passage. As you do this,
a red line will stretch and follow the cursor. Click again so that you
place a point every few inches. Don't worry if the line doesn't follow
the passage wall perfectly; we will be able to make adjustments later.
Keep making points along a segment of the passage wall. When you have
passed two or three shots, cross over to the other side of the passage
and make points while you travel back toward your starting point. |
|
|
|
|
.Don't try to outline the whole cave at once. We will be
combining small passage segments into a continuous passage outline
later. If you run into the edge of the window, you can reach the
scrollbars with the mouse scroll more of the passage onto the screen.
|
|
 |
| When you have gone all the way around your passage
segment, you will see a small square box where you started. For the
final line, click in the center of the box. This will close the outline and
draw the heavy line that forms the outline. Don't worry that the outline look square and boxy; we will smooth and make the look more
cave-like later. |
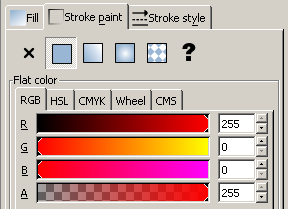
| 6. Set Fill, Line Size and Line Color. Once the
line is drawn, you can set its fill color, line thickness and line
color. On the menu bar select the "Object -> Fill and Stroke"
option. This will put a new set of options in the right-hand panel. |
| Fill. Start by selecting the "Fill" page.
If the
area you have enclosed is filled with color, this option will allow you
to remove it. To remove the filled background of your outlines, press
the [X] button on the far left. |

|
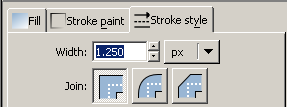
| Thickness. Next, we will set the
line thickness. Select "Stroke Style page and enter a value in
the Width box. I'm using 1.25 pixels for this example. You may want to
choose a thinner line depending on the size of your map. Whatever you
choose, it is easy to change at any time later. |
|
| Color. Finally, select the "Stroke Paint" page and choose a
color. First, make sure the "Flat Paint" button is pushed. Next, use one
of the color selection tools to pick a color. It
is sometimes useful to choose a contrasting color like red to make it
easier to see. In this case, the Compass passage model lines are gray,
so we will just use the default black color for our outlines. (Note
that whatever passage color you use, you can change it back to black at
any point later on.) |
|
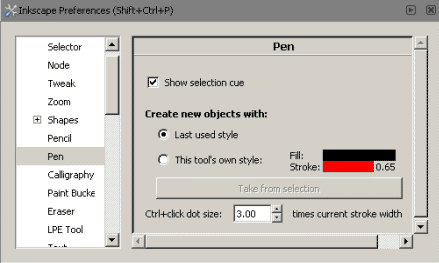
| Defaults. Since we will be using the
same thickness and color throughout this part of the process, it is
useful to set these values as the default. To do this, select the
"File -> Inkscape Preferences" option from the menu bar.
On the left panel, select the "Pen" option.
In the right panel, select the "Last Style Used" option. This will cause
the Inkscape to use the last color, thickness and fill you set as
the default for every new line you draw. |
 |
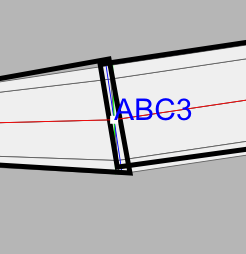
| 7. Trace The Next Segment. Now carry out the same
procedure on the next passage segment so you have two passage outlines.
Make sure as you do this that the ends of your two passage segments
overlap as shown in the image to the right. If they aren't overlapped,
we won't be able to merge them. The merging process will only take place
in the areas that are overlapped, so if you want the width of the
passage to be merged, the whole width of the two passages must overlap.
|
 |
| If the passage don't overlap the way you want, you
can use the Node Adjust tool to move the points on the
line into the proper position so things overlap. Just click on the node
you want to move and drag the point to the proper position. (There is
more information about using the Node Adjust tool later in the
tutorial.) |
| 8. Merge The Two Segments.
We will now combine
the two segments into a single outline. Select the Node Tool by clicking on the
corresponding button on the tool bar on left side of the window. When this option is
enabled, you can select and manipulate points in our outlines. |
 |
| Select the first outline by carefully clicking on the
black line. You will know if you have select the outline when a dotted
box appears around the outline. Be careful to only click on the line;
the tools can be used to select any part of the drawing, but we only
want to select the outline. You may want to zoom in a bit to get a
better view. You can also lock or temporarily turn off some of the other layers
to insure that you aren't selecting irrelevant layers. Once you have selected the first outline, hold down
the "Shift Key" and click on the second outline. This will
select the second outline and you now should have two
dotted boxes, one around each outline. |
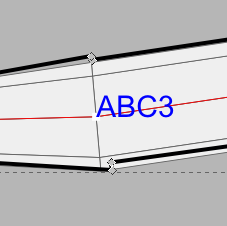 |
| From the menu bar, select the "Path -> Union" option. This will combine the two outlines into a single outline.
Everywhere that the outlines overlapped, the intersecting lines will be
replaced by open passage. Continue the process
of outlining and selecting overlapping segments until all the passages
in your map have been outlined. You probably don't want to combine
passages that cross under or over each other, but you certainly want to
combine passages that actually intersect. (Note: you may notice that the
line thickness gradually decreases as you work. I think this a bug in
Inkscape, but it is
easy to get around. Just increase the lines size periodically back to 1.25 pixels as
described in number 6 above.) |
|
|
|
|
|
|
| Sponsored Links |
|
|
| Sponsored Links |
|
|
| Sponsored
Links |
|
|
| Sponsored Links |
|
|
|

