|
COMPASS For
Windows |
|
|
|
Getting COMPASS
|
|
|
|
Download/Install Issues
|
|
|
|
Registration
Information |
|
|
|
Auxiliary Tools/Information |
|
|
|
Tutorials - (New) |
|
|
| Links |
|
|
|
Documents/White Papers |
|
|
|
COMPASS For DOS |
|
|
|
MISC. |
|
|
|
|
|
|
|
|
|
|
Adding A Legend |
| XI. Legend Information.
At this point, we will place Title and Legend information on the map.
Select the "w2d_Legend" layer. The layer will already have two sub
layers "NorthArrow" and "ScaleBar". Make sure they both locked so
you don't accidentally change them. Finally, make sure "w2d_Legend"
layer is unlocked, visible and highlighted. |
 |
| A. Add A Title.
The title will normally contain the name of the cave in large type and
any other information your mapping style dictates. |
| 1. Title Layer.
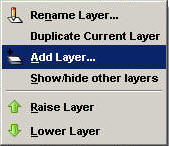
We could just put the title in the w2d_Legend layer, but
to keep things well organized, we are going to add a new sub layer for
the title. Right click on the w2d_Legend layer and select the "Add
Layer" option. |
|
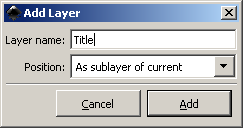
| This will bring up the "Add
Layer" dialog. Set the Layer Name to "Title" and set the Position option
to "As sublayer of current." Press the "Add" button when you are
finished.
|
|
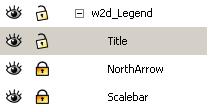
| This will insert the new
layer underneath the Legend layer. Select the Title layer and make sure
it is unlocked and visible. |
|
| 2. Title Font.
Now select the "Text Tool" from the tool bar on the left. |
 |
| First we need to choose a default font and font size.
Select the "Text -> Text and Font" option from the menu bar. |
|
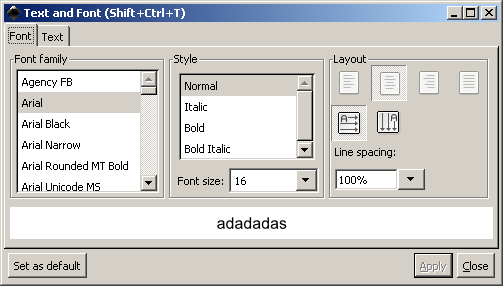 |
| Choose a Font Family and a Font Size. For a title you
probably want to choose a size in the range of 20 to 24 points. Normally
you will be centering the text around the North Arrow or the Scale Bar,
so choose the "Center" option. Now press "Set as Default" button |
3. Placing The Title.
Now click on the map at the point where you
want to place the Title. A small vertical cursor
will appear. Now just type your title. The image to the right shows the Fulford title centered on the north arrow.
| If the title ends up in the wrong place, use
the "Selection Tool" to drag the text to the the right position. |
 |
|
 |
|
If you are not happy with the font face or size, you can
change value using the options on the top tool bar. |
|
 |
| B. Legend Box.
In the next step, we'll create a shadowed legend box. This is where you
will put information about the meaning of symbol and other similar data. |
 |
| 1. Legend Box Layer.
We could just put the title in the w2d_Legend
layer, but to keep things well organized, we are going to add a new sub
layer for the title. Begin by selecting the "w2d_Legend" layer. Right
click on the w2d_Legend layer and select the "Add Layer" option. |

|
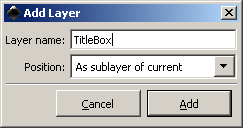
| This will bring up the "Add
Layer" dialog. Set the Layer Name to "TitleBox" and set the Position
option to "As sublayer of current." Press the "Add" button when you are
finished.
|
|
| 2. Make Rectangle.
We will start by making a rectangle, so select the
"Rectangle Tool" on the left-hand tool bar. |

|
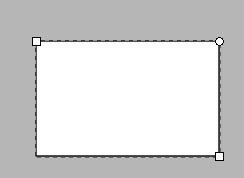
Now click on your map at the point you want to put the
Legend Box and drag. A rectangle will form as you drag.
If the rectangle is not the right color or the border
is wrong, we'll fix that now. |
|
| 3. Adjusting the
Rectangle. On the menu bar select the
"Object -> Fill and Stroke" option. This will bring up the "Fill and
Stroke" options in the right hand panel
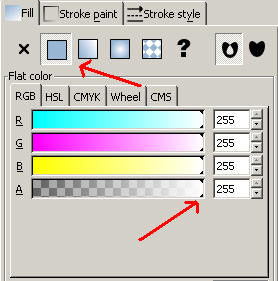
a. Fill Color. First we
will be setting the color that fills the center of the rectangle. Start
by selecting the "Fill" page. Make sure the "Flat Color" button is down.
You will probably be using a white background color, so adjust the
colors to white |
|
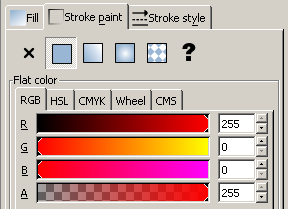
| b. Border Color.
Next, select the "Stroke Paint" page. Again, make sure the "Flat Color"
button is pushed. Next, use one of the color selection tools to pick a
color. You will probably be using black so adjust the color to black.
|
|
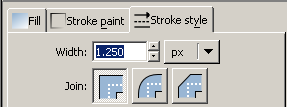
| c. Border Style.
Finally, we are going to set the border line thickness. I
usually use a thickness of 1.25 pixel, but choose a thickness that looks
good to you. |
|
| d. Drop Shadow.
We'll now add a drop shadow to our legend box to give it
a nice three-dimensional effect. First well choose the "Node Selection"
tool (Using this tool for the Drop Shadow is important because of small
bug in Inkscape.) |
 |
| Next select the rectangle
and then choose the "Filters -> Shadows and Glows -> Drop Shadow" option
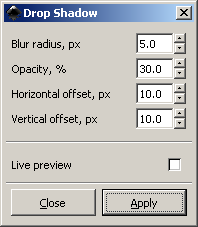
from the menu bar. This will bring up the "Drop Shadow" tool box.
This window controls the appearance of the drop shadow.
First, enable the "Live preview" option. This will allow you to see the
affects of your changes immediately.
The two offset options shift the position of the shadow
underneath the box. The more offset, the more three dimensional it
appears. The blur option controls how fuzzy the shadow appears and the
opacity controls how transparent shadow is. |
|
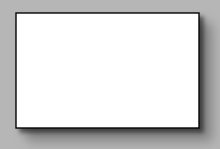
| What value you choose will
depend on your own personal taste. The values displayed above will give
the drop shadow you see to the right. Remember you can always change the
value later so don't worry over it too much. |
|
| 4. Adding Legend Items.
Legends usually contain descriptions of the
symbols used in a map. As a result, creating a legend usually involves
copying symbols from the map into the legend box. |
To do this, you will need to
unlock the layer that contains the map symbols so they can be selected.
Normally this will be the "w2d_Detail" and "w2d_Detail_shp" layers.
| Now enable the "Select Tool" by clicking on
the button in the Tool Bar to the left. |
 |
|

|
| Next, locate a good example
in the map of one of the symbols you wish to place in the legend. Select
it by clicking on it with the mouse and then type Control-C to copy it
to the clipboard. Finally, making sure the TitleBox Layer is selected,
press Control-V. This paste the item on the screen, but it probably
won't be in the Legend Box. Just drag the symbol to the proper position.
Repeat the process for all the symbols you want to include in the
Legend. |
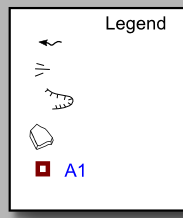
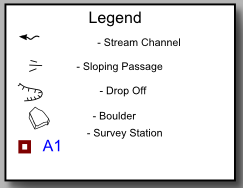
| a. Labeling Symbols
Once you have pasted symbols into the Legend
Box, your Legend will probably look something like the image to the
right. The next step will be to label
each item. While you are doing this, don't worry too much about the
position or alignment of the symbols or text. We will take care of
that in a later step.
Begin by selecting the "Text
Tool" from the tool bar on the left. |
 |
|
|
| We'll also need to choose a default font and font size.
Select the "Text -> Text and Font" option from the menu bar. |
|
 |
| Choose a Font Family and a Font Size. For the
legend you probably want to choose a size in the range of 10 to 12
points. You also want to choose the "Align Left" option. Now press
"Set as Default" button |
| Now click in your Legend Box
to the right of one of the symbols.. A small vertical cursor will
appear. Now just type your description. Again, don't worry about the
alignment at this point. Label all your symbols in this way. When you
are done, the Legend should look something like the image to the right,
with the symbols misaligned. |
|
|
If you are not happy with the font face or size, you can
change value using the options on the top tool bar. |
|
 |
| b. Aligning Symbols and
Text.
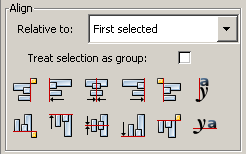
At this point we are going to use Inkscape's
alignment tools to perfectly align all the text and all the symbols.
Select the "Object -> Align and Distribute" option from the menu bar.
The alignment tools will appear in the right-hand panel. Set the "Relative to" option to "First Selected". |
 |
| Switch to the Selection Tool and then select
the top symbol.
|
 |
|
|
We are going to use it as the base position for all the
other symbols, so make sure it is exactly where you want it. |
|
Now hold down the "Shift" key and select the text the
pertains to the symbol. Both items should now be selected as depicted on
the right. |

|
| Press the align centers button. The
symbol and the text should now be vertically aligned. |
 |
|

|
Now click anywhere on the
screen to deselect all items, then reselect the top left symbol. Next,
holding down the Shift key, select all the rest of the symbols (and none
of the text.)
| Finally, press the "Align Left Edges" button. |
 |
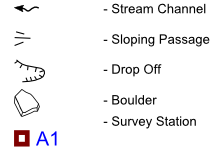
All the symbols should now have their left edges
aligned. Finally, do the same thing with the column of text
descriptions. |
|
| When you get done, the edges
will be aligned but the spacing probably won't be right. To fix this, we
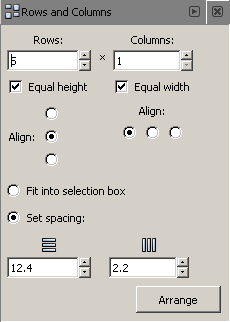
will use another Inkscape tool. Select the "Object -> Rows and Columns"
option from the menu bar. This will bring up "Rows and Columns" tool.
Select each of your symbols, starting with the top
one. Set the number of Rows equal to the number of items and set the
columns to 1. Set the Align
options as shown to the right. Finally set a spacing. In this case, I
used 12.4, but the actual number you will have to find by trial-and-error. Press the "Arrange" button and see what happens.
The program will evenly space the items vertically. If the spacing
is wrong, adjust the vertical spacing value and try again. If you lose the symbols
completely, hit Control-Z to undo the last change and bring everything
back. |
|
| When are satisfied with the
spacing, do the same process on the text descriptions. Since the text
will be a different height from the symbols, you will need to use very
different spacing from the symbols. The steps
described above can be repeated over and over until you are happy with
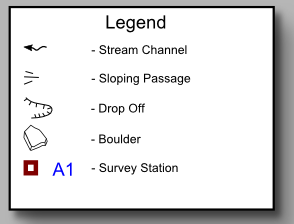
the alignment. When you are finished, the result should look something like
the legend to the right. |
 |
| c. Grouping. As
a final step, you should group all the elements in your legend
together so the whole legend can be moved or adjusted in one
operation. Start by selecting the "Selection Tool" from the left-hand tool bar. |
 |
|
| Now select one of the objects and then,
holding down the Shift Key, select the rest of the objects one at a
time. Be sure to include the legend box itself. Finally, hit Control-G. This will group the object together. You
now should be able to drag the whole legend to a new location. If one of
the elements wasn't selected, it will be left behind when you drag. If
that happens, hit Control-Z to undo the operation and reselect the group
and add the omitted item by holding down the Shift key and clicking on
it. Hitting Control-G will add the item to the group. |
|
|
|
|
|
|
| Sponsored Links |
|
|
| Sponsored Links |
|
|
| Sponsored
Links |
|
|
| Sponsored Links |
|
|
|

