|
COMPASS For
Windows |
|
|
|
Getting COMPASS
|
|
|
|
Download/Install Issues
|
|
|
|
Registration
Information |
|
|
|
Auxiliary Tools/Information |
|
|
|
Tutorials - (New) |
|
|
| Links |
|
|
|
Documents/White Papers |
|
|
|
COMPASS For DOS |
|
|
|
MISC. |
|
|
|
|
|
|
|
|
|
|
Merging |
| VI. Add A Mask Layer.
This step
allows us to create a mask for the passages. The mask is a an outline of
the passages that has been filled with color. The mask allows you to
separate the floor color from the passage wall lines. |
| Begin by making sure your passage outline
is selected. Using the Node Tool, click on the passage wall lines.
|
 |
| A. Copy Passage Walls. You can tell
if the passage walls are
selected because dots will appear on each of the nodes. Now choose
the "Edit -> Copy" option from the menu bar. This will put a copy of the
passage out line in the clipboard. |
 |
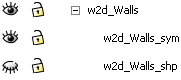
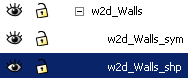
| Next, turn off the "w2d_walls_shp" layer.
You do this by clicking on the little "eye" icon so that it closes. When
you do this, the passage wall lines you just drew should disappear. |
 |
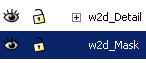
| B. Paste Passage Walls. Now find the w2d_Mask layer and click on it
so it is highlighted. Also, make sure the layer is unlocked. Finally, select the "Edit -> Paste In Place"
option from the menu bar. This will paste a copy of the passage wall
lines into the w2d_Mask layer. The passage wall lines should reappear.
Note: it is very important that you use the "Paste In
Place" option. The ordinary Paste will put the outline in the wrong
place. |
 |
| If you get an error when paste the layer,
this is caused by a bug in Inkscape version 0.46. You should make sure
you download Inkscape versions 0.47 or newer. |
| C. Remove Lines.
We will now remove the passage wall lines
while leaving only the fill color for the passage. This will form the passage
floor color for your map. |
| On the menu bar select the
"Object -> Fill and Stroke" option. The Fill and Stroke options will
appear on the right side of the window. |
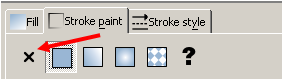 |
| Select the "Stroke Paint"
page, then press the "X" button. This will remove the border from the
passage walls leaving only the fill color. (You can add all kinds of
special effects to the mask fill color to make your maps more colorful.
For this tutorial, we'll just leave it white.) |
 |
| D. Remove Fill.
The final step in making the mask is to go back to your passage walls
layer and remove the fill color. This will make the
interior of the passages transparent so that details on the passage
floor will show through. |
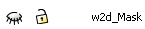
| Turn off the w2d_Mask layer by clicking on
the "eye" icon. The mask layer should disappear. |
 |
| Now turn on the w2d_Walls_shp layer and
highlight it to make sure it is selected. The passage wall line should
now become visible. |
 |
| Choose the Node Tool and click on the
passage wall lines that are now visible. |
|
| Finally, select the "Object -> Fill and
Stroke" option from the menu bar. Switch to the "Fill"
page and then press
button with the "X" in the middle. |

|
|
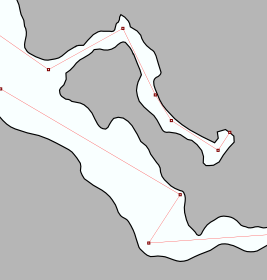
This will turn off the fill option for the
passage outline and the information from layers below the passage wall
should show through. The image to the right shows how the map should
look. The passage wall line should be displayed on top of the underlying
layers. If you don't see the underlying layers, turn on the
cmp_tracing and cmp_sketchmap1 layers. You should see an image that
looks similar to the one to the right. |
|
| You can now turn the Mask layer back on. Also, turn on the
background layer |
|
|
You should now see an image that looks similar to the one to the
right. The mask gives you a background for drawing passage details. Having a Mask as a separate layer
makes your maps flexible. For example, you could make several copies of
the mask and use each one for a different purpose. You could have a
white mask for serious maps and a colored, gradient mask for multi-media
presentations. |
 |
|
|
|
|
|
|
| Sponsored Links |
|
|
| Sponsored Links |
|
|
| Sponsored
Links |
|
|
| Sponsored Links |
|
|
|

