Compass Cave Survey Software Logo - Bats, Compass and Night Sky
Custom Search
 
 Sponsored Links


COMPASS For Windows
• Compass Tour
• Other New Features
• Cartography Tools
• Live 3D Cave Images
• On-line Help (New)
• Written Description
• Revision History: 99-21
• Testimonial Letters
• Contact Author
Getting COMPASS
• Getting Compass
•Compass On A CD.
• Previous Versions  (New)
Download/Install Issues
• Installation Instructions
• Antivirus Issues
• Authenticating Files
• False Positives
Registration Information
• Credit Card Reg.
• Reg. Info/Forms
• Printable Reg. Form
• 3rd Party Reg. Form
Auxiliary Tools/Information
• Cave Data
• 3D Glasses
• ESRI/ArcView Tools
Tutorials - (New)
• Inkscape Tips and Tricks
• Radio Locations
• Magnetic Anomalies
• Installing Under Win8
• Compass on Mac/Linux
• Google Earth Overlay
• Declination/Convergence
• Cartography Tools
• Sketch Editor.
• SVG Export
• Inkscape SVG Maps
• Illustrator SVG Maps
• SVG Round Tripping
• Adopting SVG Maps
• Complex Plot Tutorials
• Trouble Shoot CaveX
• Exporting HPGL
• Canvas Digital Map 
• ArcView/ESRI
• Italian Tutorial
• Using the Compass CD
• DEM Tutorial
Links
• Cave Related Links
• User's Pages
• User's Group
• User Questions
Documents/White Papers
• Compass File Formats
• ArcView/ESRI
• Finding Blunders
• Finding Loops
• Loop Closure
• Least Squares Papers
• Least Squares Issues
• Passage Modeling
• Survey Blunders
• J. Halleck- On Loops
• History/Philosophy
• SEF File Format (1992)
• About The Author
COMPASS For DOS
• DOS Compass Demos
• DOS Compass Features
• Magazine Review
MISC.
• Betas
• Other Products


<< Last

Top

Next >>

Opening Passages

VII. Opening Passages. Up to this point, we have enclosed the entire passage outline because it makes it easier to draw, merge segments and make masks. However, most cave maps have places where the passage outline is broken or open. For example, the passage walls are usually open at the entrance and for passages that continue or haven't been completely explored. For this reason, we will need to open the passages in various place along the outline.
You begin by zooming in on the portion of the passage wall that want to open.

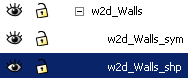
Next, go to the Layers display and select the "w2d_walls_shp". Make sure it is visible, unlocked and highlighted.
 
Finally, choose the "Node Tool from the left hand tool bar.

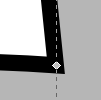
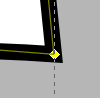
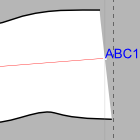
At this point, we need to select the line we are going to remove to open the passage. To do this click on the line itself, (between nodes). The node markers should appear. Click a second time, and if you look closely, the markers on both ends of your line should have turned yellow as illustrated by the images to the right. This means the line itself has been selected.


Once the line has been selected, we can remove it. To remove the line, press the "Delete Path Between Two Non-End Points Nodes" button.

The line should disappear. You can now flare the passage walls and draw drip-lines and other features that pertain to the entrance or passage continuations.

If you have any trouble, go back and make sure the proper layer and line is selected. You can undo any accidental changes using the "Edit ->Undo" option from the menu bar or typing Control-Z.


<< Last

Top

Next >>

 
 Sponsored Links
Sponsored Links
 Sponsored Links
 Sponsored Links

<< Home

Custom Search