|
|
|
Preparations |
| I. Preparations.
There are several things you
need to do before you begin the process of adjusting and combining your
sketch-maps. Attention to details with this step will make the whole
process much easier and produce a better end result.
A. Prepare
Plot File. The program uses the survey data to morph the image, so
you need to make sure you have the most current data and that you have
compiled it recently. If your sketches are are oriented to True North, your plot
file also needs to be oriented to True North. This means you must have
declination values for every survey. If you don't have declinations, you
can tell Compass to calculate them automatically during the compile
process.
Likewise, if your sketch-maps are oriented to magnetic north, you
should make sure the "Use Declinations" option is turned off when you
compile the cave. You can also set all your declinations to zero, but
that is not advisable because you will lose data.
Finally, it is not always possible to adjust your
survey data to match your sketch-maps. For example, you might have a
plot file, with no data files. That would prevent you from adding
declination or recompiling the surveys. If that is the case, you can
manually rotate the plot in step
III. B. However, you have to know how much to rotate and you have
to be consistent about applying the same rotation to all surveys in your
map. |
| B. Prepare Your Sketches. Make sure all your
sketches have a line indicating the north direction. Most sketch-maps
are drawn on grids which work very well for this purpose. If your sketches
don't have north lines or a grid, draw one using a triangle or square to make sure
they are parallel to the sides of the paper. Try to be as accurate as
possible using a thin pencil or pen line. Also, make the line is long as
possible. Long lines measure rotation angles more accurately. The more
accurate you are the less adjusting you will have to do later.
Likewise, you need two pieces of scaling information on each sketch.
First, you need marks indicating an inch or a centimeter on the paper. This
will be used to make the scanned-images uniform. Second, you need a bar
or marks indicating the cave scale. This should be in Feet per Inch or
Meters per Centimeter. If the sketch has gridlines and the cave scale matches
that grid, you can use the grid lines. If the scale is not marked,
you can draw your own. Again, try to be as accurate as possible, using
thin, straight lines that will show up well in the scanned images. |
| C. Scan Your Images. Before you can trace your
sketch-maps, you need
to scan them into your computer. The Compass tools will allow you to rotate,
scale and merge the images, but you should try to be consistent about how you
scan your maps. This will reduce the amount of work you'll have to do on the
computer.
Try to scan the images so that north is always up.
This will save you having to rotate the images with the Compass Tools.
Also, use a consistent scale with all your scans. For the caves I've
worked on, 100 dpi seems to work best. Any larger and the images would
be large an unwieldy. Some of this will depend on your computer and the
cave. If you have a large screen monitor, you may be able to get away
with higher resolutions.
Bear in mind that the large images use large amounts
of memory and it is fairly easy to run out of memory. For example, a
5,000 x 5,000 can use 100-megabytes of memory. When the program is
handling several of images at the same time, it can easily consume more
than 1-gigabyte of memory. That is more memory than many computer have.
Don't worry if you cannot follow all these recommendations. The
Compass tools will allow you to properly rotate and scale the images to
match whatever standard you have chose. |
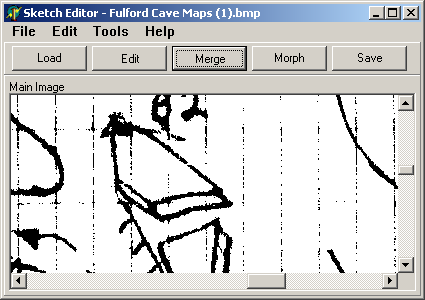
| D. Run Sketch Editor.
Once all
sketches have been scanned, run Compass sketch-map Editor. If you haven't installed it
on your computer, you can download a copy from the
Compass web site. Once
the Editor has been installed, you will find icon on your Desktop for
the
Editor. Just double click on the icon. The image to the right shows the
Editor's main window. The key operations of the Editor
can be carried out through buttons along the top of the window. Additional
tools and options can be found in the menu. |
|
|
|
|

